what’s the best self defense martial art

what’s the best self defense martial art

In the realm of self-defense, the choice of martial art can be a critical one. With so many different styles to choose from, each with its own strengths and weaknesses, it can be difficult to know which one is right for you. However, there are certain criteria that can help you narrow down your choices, such as effectiveness, practicality, and ease of learning. In this article, we will explore the various factors that contribute to making a martial art effective for self-defense and identify the ones that stand out as the best options. While there is no single “best” martial art for self-defense, there are certainly some that are better suited to the task than others.

When it comes to effectiveness, the most important factor is whether or not the martial art can actually help you defend yourself in a real-world situation. This means that it must be able to teach you how to deal with common attacks, such as punches, kicks, and grabs. It should also teach you how to defend yourself against multiple attackers and how to use your environment to your advantage. Practicality is another important factor to consider. The martial art you choose should be something that you can actually use in a self-defense situation. This means that it should be relatively easy to learn and that the techniques should be easy to remember and apply under pressure. Finally, you should consider the ease of learning. The martial art you choose should be something that you are willing to put in the time and effort to learn. If the learning curve is too steep, you are less likely to stick with it and you will not be able to benefit from its self-defense applications.

Best Self-Defense Martial Arts

Selecting the best self-defense martial art depends on individual factors such as age, physical fitness, available training, and personal preferences. However, some martial arts are widely recognized for their effectiveness in self-defense situations:

Traditional Martial Arts

These arts prioritize realistic self-defense techniques and include:

– Krav Maga:

Developed by the Israeli military, Krav Maga emphasizes quick, instinctive, and efficient moves that neutralize threats.

– Brazilian Jiu-Jitsu (BJJ):

Focused on grappling and submission holds, BJJ empowers smaller individuals to defend against larger opponents.

– Judo:

A Japanese martial art known for its throws and locks, Judo aims to quickly incapacitate or control an attacker.

Modern Martial Arts

These arts combine techniques from traditional martial arts and other disciplines:

– Mixed Martial Arts (MMA):

A combination of wrestling, boxing, grappling, and other techniques, MMA provides a well-rounded approach to self-defense.

– Jeet Kune Do:

Founded by Bruce Lee, Jeet Kune Do emphasizes adaptability, speed, and efficiency, aiming to exploit an opponent’s weaknesses.

People Also Ask:

What’s the best self-defense martial art for beginners?

Arts like Krav Maga, BJJ, or MMA are beginner-friendly and offer practical self-defense techniques without requiring extensive training.

What’s the most effective martial art against multiple attackers?

MMA, Krav Maga, and Jeet Kune Do provide effective strategies for dealing with multiple opponents, emphasizing situational awareness and quick, decisive action.

Can martial arts be used for self-defense without hurting the attacker?

While some martial arts prioritize incapacitation or submission, techniques like grappling and Aikido can be utilized to control and restrain an attacker without causing excessive harm.

5 Ways to Master Shark Man Karate

5 Ways to Master Shark Man Karate

Shark Man Karate is an ancient martial art that dates back centuries. It is said to have been developed by a group of fishermen who were attacked by a shark. The fishermen fought off the shark using their bare hands and feet, and they developed a set of techniques that they used to defeat the shark.

Shark Man Karate is a very effective martial art. It is based on the principles of power, speed, and precision. The techniques are designed to inflict maximum damage on an opponent with minimal effort. Shark Man Karate is also a very versatile martial art. It can be used for self-defense, competition, or even as a form of exercise.

If you are interested in learning Shark Man Karate, there are a number of schools and instructors who can teach you the basics. You can also find many resources online that can help you learn the techniques. With a little practice, you can master the art of Shark Man Karate and protect yourself from any threat.

$title$

Master the Fluidic Movements of the Sea Predators

The slick, serpentine movements of sharks are a testament to their predatory prowess in the depths of the ocean. To emulate their fluidity in martial arts combat, Shark Man Karate emphasizes graceful transitions, agile footwork, and deceptively swift strikes. By harnessing the principles of shark locomotion, practitioners gain an edge in combat, moving like shadows through the battlefield.

Develop Keen Spatial Awareness

Sharks rely heavily on their keen spatial awareness to navigate the vast expanse of the ocean. Imitating this ability in Shark Man Karate involves developing an acute sense of your surroundings, anticipating your opponent’s movements, and reacting accordingly. This heightened awareness allows for precise timing, evasive maneuvers, and unpredictable strikes that keep adversaries on their toes.

Harness the Fluidic Power of the Lateral Line

One of the most remarkable features of sharks is their lateral line, a sensory system that detects subtle changes in water pressure. By honing a similar sensitivity, Shark Man Karate practitioners can perceive the slightest shifts in their opponent’s energy, muscle tension, and footwork. This heightened sensitivity enables them to anticipate attacks, seamlessly adjust their stances, and respond with lightning-fast countermeasures.

Emulate the Agility of the Shark’s Sinnews

Sharks’ flexible bodies and supple muscles allow them to make rapid and precise movements during the hunt. In Shark Man Karate, practitioners develop similar agility by strengthening their core, improving their flexibility, and honing their balance. This enhanced agility translates into swift footwork, agile dodges, and powerful strikes that catch opponents off guard. By emulating the sleek and elusive nature of sharks, practitioners of Shark Man Karate become formidable adversaries in any combat scenario.

Develop Sharpened Instincts and Unwavering Determination

To master Shark Man Karate, you must cultivate your instincts and resolve. Here are some steps:

1. Immerse Yourself in the Water:
Spend time in water, swimming, diving, and observing marine life. This will enhance your water fluidity and awareness.

2. Study Predators:
Observe sharks and other predators, paying attention to their hunting techniques, body language, and behavior. This will provide insights into the instincts you need to develop.

3. Practice Relentless Focus:
Maintain unwavering concentration during training and combat. Clear your mind of distractions and stay present in the moment.

4. Develop Peripheral Vision:
Expand your field of view to detect threats and opportunities from all angles.

5. Cultivate Graceful Movement:
Move with the fluidity of a shark, transitioning seamlessly between offense and defense.

6. Harness Your Intuition:
Trust your gut instinct and make quick decisions based on your observations.

7. Embody Shark-Like Resilience:
Like sharks, be adaptable and resilient. Face challenges head-on, learn from setbacks, and emerge stronger.

How To Get Shark Man Karate

Shark Man Karate is a powerful and dangerous martial art that can be used to defeat even the most powerful opponents. It is a combination of strength, speed, and agility, and it can be used to both attack and defend. If you want to learn Shark Man Karate, there are a few things you need to do.

First, you need to find a qualified instructor. Shark Man Karate is a difficult martial art to learn, and it is important to find an instructor who can teach you the proper techniques. A good instructor will be able to help you develop the strength, speed, and agility that you need to succeed in Shark Man Karate.

Once you have found an instructor, you need to start practicing. Shark Man Karate is a physical martial art, and it takes time and practice to develop the skills that you need. You will need to practice regularly if you want to master Shark Man Karate.

In addition to practicing, you also need to study the theory behind Shark Man Karate. This will help you understand the principles of the art and how to apply them in combat. The more you know about Shark Man Karate, the better you will be at using it.

If you are willing to put in the time and effort, you can learn Shark Man Karate. It is a powerful and dangerous martial art that can help you to defeat even the most powerful opponents.

People Also Ask

What is the difference between Shark Man Karate and other martial arts?

Shark Man Karate is a unique martial art that combines strength, speed, and agility. It is different from other martial arts in that it focuses on using the body’s natural weapons, such as the fists, feet, and elbows. Shark Man Karate also emphasizes the use of grappling techniques, which can be used to control and defeat opponents.

How long does it take to learn Shark Man Karate?

The time it takes to learn Shark Man Karate varies depending on the individual. Some people may be able to learn the basics in a few months, while others may take years to master the art. It is important to be patient and to practice regularly if you want to succeed in Shark Man Karate.

Is Shark Man Karate dangerous?

Shark Man Karate is a powerful and dangerous martial art. It is important to learn the proper techniques from a qualified instructor before attempting to use it in combat. If you are not properly trained, you could injure yourself or others.

1 Quick and Easy Way To Tie Hands With A Belt

5 Ways to Master Shark Man Karate

In the realm of self-defense and restraint techniques, the ability to tie someone’s hands with a belt can prove invaluable. This technique, commonly employed by law enforcement and security personnel, offers a practical and effective method of subduing an individual without causing undue harm. Its simplicity and versatility make it a valuable skill for anyone seeking to enhance their personal safety or contribute to public well-being.

The act of tying hands with a belt involves utilizing a standard belt to restrict an individual’s movement, preventing them from using their hands offensively or defensively. The technique begins with securing the belt around the individual’s wrists, ensuring a snug fit to minimize the risk of slippage. Transitioning smoothly, the loose end of the belt is then threaded through the loop formed by the wrists, creating a secure and adjustable hold. By following a series of precise steps, the practitioner can effectively restrain the individual while maintaining control over their movements.

This technique not only serves as a valuable self-defense measure but also finds applications in various other contexts. In situations involving conflict resolution or the apprehension of suspects, the ability to tie hands with a belt can help de-escalate tense encounters and ensure the safety of all parties involved. Furthermore, this technique can be incorporated into training programs for law enforcement, security guards, and individuals seeking to enhance their personal safety skills. By mastering this technique, practitioners can contribute to the maintenance of order and public safety while upholding their duty to protect and serve their communities.

How To Tie Hands With A Belt

Selecting the Right Belt

Choosing the appropriate belt for the task at hand is crucial for both effectiveness and safety. Here are some factors to consider when selecting a belt:

Material

The material of the belt determines its strength and durability. Leather belts are a popular choice due to their durability and resistance to tearing. Nylon belts are lightweight and flexible, making them suitable for tasks requiring mobility. Cotton belts are softer and more comfortable to wear for extended periods.

Width

The width of the belt affects its binding capacity. Wider belts distribute pressure more evenly, making them more comfortable for tying hands behind the back. Narrower belts are less bulky and can be used for more delicate tasks.

Length

The length of the belt determines the number of turns that can be made around the wrists. A longer belt provides more security, but can be more cumbersome. A shorter belt can be more comfortable to wear, but may limit the binding options.

Hardware

The type of hardware on the belt, such as the buckle and D-rings, can affect its reliability. Solid metal hardware is more durable and less likely to break or come loose.

Comfort

If the belt will be worn for an extended period, comfort is an important consideration. A belt with a soft lining or padding can reduce chafing and discomfort.

By considering these factors, you can select a belt that meets the specific requirements of the task and ensures both effectiveness and safety.

Preparatory Measures

1. Preparation of Materials

Before proceeding with the tying process, ensure you have the following materials at hand:

  1. A pliable belt with adequate length and sufficient strength
  2. A flat surface or a cooperative person to assist with restraints

2. Physical Examination and Safety Considerations

It is crucial to assess the physical condition of the person being restrained prior to tying their hands. Consider the following:

Health Concerns Precautions
Joint injuries, fractures, or sprains Avoid excessive pressure or movement that may aggravate pain
Circulatory issues or numbness Tie the belt loosely enough to not constrict blood flow
Pregnancy or advanced age Handle with extra care and avoid prolonged restraint

Remember to remain respectful and mindful of the person’s dignity and well-being throughout the process.

3. Restraining Position

Position the person in a secure and comfortable position for tying. Ideal options include:

  • Sitting upright against a wall or chair
  • Kneeling on the floor with hands extended forward
  • Lying face down with arms extended in front

Looping Around the Right Wrist

Now, it’s time to secure the belt around your right wrist. Hold the loose end of the belt in your right hand, palm facing you. Bring the loose end up over and behind your right wrist, then down through the loop you created in Step 2. Pull the loose end tight, ensuring it snugly wraps around your wrist.

Next, take the loose end and wrap it around your right wrist again, this time passing it over the top and bringing it down through the loop just created. Pull the loose end tight, creating a second loop around your right wrist.

Finally, repeat Step 5, wrapping the loose end around your right wrist once more and pulling it through the loop. This will create a secure knot that holds the belt firmly in place around your wrist.

To ensure the knot is secure, you can perform the following checks:

Check Description
Pull Test Gently tug on the loose end of the belt to ensure the knot will not slip or loosen.
Wrist Movement Test Move your right wrist up and down, side to side, and in a circular motion to verify that the belt remains securely tied and does not restrict your movement.

Interlacing

To interlace the belts, cross them over each other, forming an “X” shape. Bring the left belt over the right and the right belt over the left. Repeat this process until the belts are tightly interwoven.

Tightening

Tighten the belts by pulling simultaneously on both ends of the belts. To create a tighter hold, cross the belts over each other once more, forming a “figure-eight” shape. This additional crossing will increase the friction and make it more difficult for the person to escape.

Method 4: Additional Knots

For enhanced security, consider tying additional knots at the intersection of the belts. These knots will further strengthen the hold and prevent the belts from loosening.

Knot Type Description
Square Knot A simple and reliable knot that creates a strong and secure hold.
Overhand Knot A quick and easy knot that provides a decent level of security.
Figure-Eight Knot A versatile knot that offers increased friction and is more difficult to untie.

Securing the Left Hand

1. Create a Loose Loop: Grip the belt with your left hand, leaving about 12 inches of loose fabric. Form a small loop with the loose end.

2. Pass the Loop Through the Belt: Bring the loop up and over the main belt, creating a small hole.

3. Insert Your Hand: Slide your left hand through the hole and pull the loop tight to secure it.

4. Form a Figure-Eight: Cross the loose end over the main belt, then bring it under your left thumb and back over the main belt. Repeat this step to create a figure-eight pattern.

5. Tighten and Secure: Pull the loose end firmly to tighten the figure-eight and secure your left hand. You can also tie a knot to ensure it stays in place.

Important Note:

The tightness of the binding should be such that it prevents your left hand from moving, but it should not be excessively tight or cause any discomfort.

Double-Looping for Added Security

For maximum security, consider using the double-looping technique. This method involves creating two loops around the person’s wrists, providing an extra layer of restraint.

To double-loop a belt, follow these steps:

1. Start with a secure knot:

Begin by tying the belt around the person’s wrists with a simple overhand knot. Make sure the knot is tight and secure.

2. Create the first loop:

Pass the free end of the belt through the overhand knot you just created. Make sure to feed it from the bottom, creating a loop on one wrist.

3. Wrap the belt around the second wrist:

Take the free end and wrap it around the other person’s wrist. This will create another loop.

4. Pass the belt back through the first loop:

Now, take the free end of the belt and pass it through the first loop you created in Step 2. Make sure to tighten it securely.

5. Repeat Step 4:

Repeat Step 4, passing the free end through the second loop again. This will create a double-loop that goes around both wrists.

6. Tighten the loops and secure the knot:

Pull on both free ends of the belt to tighten the loops and the initial overhand knot. Double-check the security of all knots and make any necessary adjustments to ensure the person is restrained comfortably and securely.

The double-looping technique provides added security by preventing the person from easily slipping out of the restraint. It is a reliable and effective method for restraining someone when necessary.

Unlocking the Knot

Once you have secured the person’s hands together, it’s important to know how to release the knot in case of an emergency. Follow these steps to safely untie the belt:

  1. Locate the Buckle: The buckle is the metal clasp that holds the belt together. It’s usually located at the end of the belt and has a small lever or button.
  2. Release the Buckle: If the buckle has a lever, push it down and pull the ends of the belt apart. If it has a button, press the button and pull.
  3. Unwind the Belt: Once the buckle is released, carefully unwind the belt from the person’s hands. Do it slowly to avoid causing further injury.
  4. Check for Circulation: After the hands are untied, check the person’s hands and arms for circulation. Look for any signs of numbness, tingling, or discoloration.
  5. Seek Medical Attention if Necessary: If the person experiences any pain or discomfort after the belt is untied, seek medical attention immediately.
Potential Hazards Precautions
Cutting off circulation Untie the belt slowly and carefully, and check for circulation after releasing it.
Causing injury to the person Use the belt only as a temporary restraint, and avoid applying excessive force.
Escaping Make sure the knot is secure and that the ends of the belt are not accessible to the person.

Other Tying Methods

There are several other ways to tie hands with a belt, depending on the situation and the desired level of security. These methods include:

The Crossed-Hand Tie

This method is similar to the standard tie, but it provides additional security by crossing the hands before tying. To perform this tie, follow these steps:

  1. Place the belt around the person’s wrists, with the buckle end on one side and the free end on the other.
  2. Cross the person’s hands over each other, with the left hand on top.
  3. Tie the belt behind the hands, using the standard tie method.
  4. Tighten the knot securely.

The Butterfly Tie

This method creates a more secure tie by forming a series of loops. To perform this tie, follow these steps:

  1. Place the belt around the person’s wrists, with the buckle end on one side and the free end on the other.
  2. Make a small loop with the free end of the belt and thread it through the buckle.
  3. Make a second loop with the free end and thread it through the first loop.
  4. Continue threading the free end through the previous loops until a series of knots is formed.
  5. Tighten the knots securely.

The Figure-Eight Tie

This method is more complex but provides the highest level of security. To perform this tie, follow these steps:

  1. Place the belt around the person’s wrists, with the buckle end on one side and the free end on the other.
  2. Make a figure-eight loop with the free end of the belt.
  3. Pass the free end through the loop twice, creating a second figure-eight loop.
  4. Tighten the knots securely.

Alternative Restraint Techniques

In certain scenarios, using a belt may not be the most appropriate or available means of restraint. Alternative techniques include:

1. Zip Ties: Durable and adjustable for a snug fit. Ensure they are not overtightened to avoid circulation issues.

2. Handcuffs: Designed for secure restraint, but require training for proper use. Ensure they are not too loose or tight.

3. Duct Tape: Can be used to secure wrists or ankles temporarily. Avoid covering the mouth or nose, as it can restrict breathing.

4. Rope: Strong and versatile, but requires skilled tying to prevent loosening. Ensure the knots are secure and not too constricting.

5. Clothing: Clothing items, such as belts, shirts, or jackets, can be used for improvised restraints in emergencies.

Advanced Belt Tying Technique

For more secure and effective belt restraint, consider the following technique:

  1. Place the folded belt behind the person’s back at the level of their wrists.
  2. Bring the ends of the belt over each wrist and cross them in front.
  3. Pull the ends of the belt tightly to bring the wrists together.
  4. Wrap the belt around both wrists several times, ensuring it is snug but not cutting off circulation.
  5. Tuck the ends of the belt into one of the loops to secure it.
  6. Check the tightness and adjust as needed to prevent slipping or discomfort.
  7. Monitor the person’s circulation and loosen the belt if necessary.

Advantages and Disadvantages of Alternative Restraint Techniques

Technique Advantages Disadvantages
Zip Ties Durability, adjustability Potential for overtightening, bruising
Handcuffs Secure restraint Requires training, can be uncomfortable
Duct Tape Temporary restraint Potential for skin irritation, breathing problems
Rope Strong, versatile Requires skilled tying, can be bulky
Clothing Improvised, cost-effective Less secure, easily removed

Safety Precautions

To ensure your safety while tying your hands with a belt, it is crucial to follow these precautions:

  1. Never restrain someone without their consent. This is not only illegal but also unethical and can lead to serious injuries.
  2. Use a belt made of a soft, flexible material. Leather belts or fabric belts are usually suitable. Avoid using stiff or sharp belts that could cause cuts or abrasions.
  3. Tie the belt loosely enough to allow blood flow. The belt should be snug but not constricting. If the belt is too tight, it can cut off circulation and cause serious injuries.
  4. Do not tie the belt for an extended period. Extended restraint can lead to nerve damage or other complications.
  5. Monitor the person who is tied up regularly. Check for signs of discomfort or distress, and loosen the belt if necessary.
  6. Never tie someone up face down. This can lead to suffocation.
  7. If the person becomes unresponsive or unconscious, release the belt immediately and call for medical help.

Legal Implications

In many jurisdictions, it is illegal to restrain someone without their consent, even if it is for their own safety. If you are considering restraining someone, it is important to be aware of the legal implications in your area.

Jurisdiction Legality of Restraint
United States Generally illegal, except in certain limited circumstances (e.g., for medical or law enforcement purposes)
United Kingdom Generally illegal, except with the consent of the person being restrained
Canada Generally illegal, except with the consent of the person being restrained or in certain limited circumstances (e.g., for medical or law enforcement purposes)

If you are unsure about the legality of restraining someone in your area, it is always best to consult with an attorney or law enforcement officer.

How to Tie Hands with a Belt

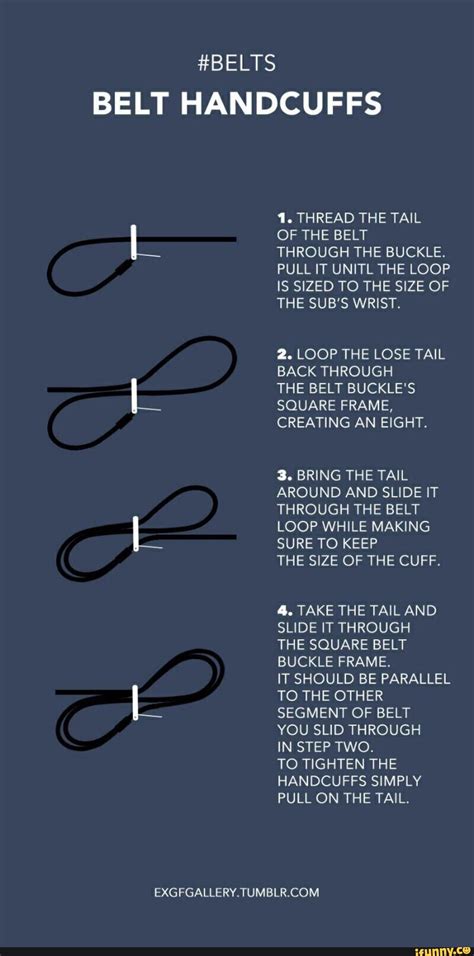
Tying someone’s hands with a belt is a simple and effective way to restrain them. It can be used to prevent them from hurting themselves or others, or to prevent them from escaping. To tie someone’s hands with a belt, follow these steps:

  1. Place the belt around the person’s wrists, with the buckle in front.
  2. Cross the belt over the person’s right wrist.
  3. Bring the belt under the person’s left wrist and up through the loop created in step 2.
  4. Tighten the belt by pulling on the loose ends.
  5. Tie the belt securely by making a knot or bow.

Once the belt is tied, the person’s hands will be immobilized. They will not be able to move their hands or fingers, and they will not be able to escape.

People Also Ask

How do you tie someone’s hands with a belt behind their back?

To tie someone’s hands with a belt behind their back, follow these steps:

  1. Place the belt around the person’s wrists, with the buckle in front.
  2. Cross the belt over the person’s left wrist.
  3. Bring the belt under the person’s right wrist and up through the loop created in step 2.
  4. Pull the belt tight and bring it behind the person’s back.
  5. Cross the belt over the person’s right wrist again.
  6. Bring the belt under the person’s left wrist and up through the loop created in step 5.
  7. Tighten the belt and tie it securely.

How do you tie someone’s hands with a belt without a buckle?

To tie someone’s hands with a belt without a buckle, follow these steps:

  1. Place the belt around the person’s wrists.
  2. Cross the belt over the person’s right wrist.
  3. Bring the belt under the person’s left wrist and up through the loop created in step 2.
  4. Pull the belt tight and tie it in a knot or bow.

Is it legal to tie someone’s hands with a belt?

The legality of tying someone’s hands with a belt depends on the circumstances. In general, it is not legal to restrain someone without their consent. However, there are some exceptions to this rule. For example, it may be legal to restrain someone if they are a danger to themselves or others, or if they are being arrested.

How To Hogtie Someone

Hogtying, an ancient technique used to restrain individuals, involves binding their limbs together in a specific manner. This method, when executed correctly, can effectively immobilize a person and prevent them from causing harm to themselves or others. Hogtying has its roots in various cultures and has been employed in law enforcement, self-defense situations, and even in the restraint of animals. Understanding the proper technique for hogtying is crucial for ensuring the safety of both the individual being restrained and those performing the procedure.

The process of hogtying typically begins by securing the person’s hands behind their back with handcuffs or a similar restraint. It’s important to ensure that the restraints are snug but not overly tight, allowing for some circulation while preventing the individual from breaking free. Next, the person’s legs are brought together and bound at the ankles. A length of rope or cord is then used to tightly bind the ankles to the wrists behind the back, forming a secure loop that effectively immobilizes the limbs. Additional restraints may be applied around the individual’s body to further restrict their movement and prevent escape.

Hogtying, when performed correctly, can effectively restrain an individual without causing undue discomfort or harm. However, it’s crucial for those performing the procedure to be trained and experienced in the technique to avoid any potential injuries or complications. The use of hogtying should be limited to situations where it is necessary to restrain an individual for their own safety or the safety of others. Proper training and understanding of the technique are essential to ensure its safe and effective application.

Restraining the Person’s Legs

Once the person’s arms are secured, move on to restraining their legs. This will help prevent them from kicking or running away.

Step 1: Position Yourself Behind the Person

Stand behind the person with your feet shoulder-width apart and your knees slightly bent. This will give you a stable base and allow you to control the person’s legs effectively.

Step 2: Grab the Person’s Ankles

Reach down and grab the person’s ankles from behind. Keep your grip firm but not too tight, as you don’t want to cause unnecessary pain.

Step 3: Pull the Person’s Legs Together

Pull the person’s legs together and bring them up towards their buttocks. Keep your arms straight and your grip firm.

Step 4: Tie the Person’s Legs Together

Using a piece of rope or cord, tie the person’s legs together at the ankles. Make sure the knots are tight and secure, but not so tight that they cut off circulation.

Knot Type Description
Square Knot A simple and secure knot that is easy to tie.
Bowline Knot A strong and versatile knot that will not slip.
Clove Hitch Knot A secure knot that can be used to tie objects to poles or trees.

Once the person’s legs are tied together, they will be effectively restrained. However, it is important to monitor the person and ensure that their circulation is not being cut off. If you notice any signs of discomfort, loosen the knots or release the person altogether.

Completing the Hogtie

Once the person is in the hogtie position, complete the tie by following these steps:

  1. Loop one end of the rope around the ankles: Pass the rope under the ankles, crossing it over itself to create a loop. Pull the ends of the rope tight to secure the ankles.
  2. Bring the ends of the rope up and around the knees: With the ankles tied, bring the ends of the rope up and wrap them around the knees, again crossing them over each other. Pull the rope tight to secure the knees.
  3. Tie the ends together behind the knees: Bring the ends of the rope together behind the knees and tie them together securely. This will prevent the person from kicking or moving.
  4. Twist the rope and secure it: After tying the ends together, twist the rope several times to create tension. Secure the twist by wrapping a piece of tape or a cable tie around it.
  5. Tuck the ends of the rope: To finish the hogtie, tuck the loose ends of the rope under the person’s body so that they don’t become tangled or get in the way.
Key Points Details
Ankle loop Securely cross the rope under the ankles to prevent movement.
Knee wrap Cross the rope around the knees for additional control.
Rope twist Create tension by twisting the rope and securing it to prevent loosening.

Proper Protocol for Hogtie Use

The Importance of Hogtie Safety

Hogties are an effective method of restraining an individual, but it’s crucial to use them correctly to prevent injury or harm. Officers must follow strict protocols and guidelines to ensure safety.

Training and Certification

Officers must receive comprehensive training and certification before using hogties. This training covers the proper techniques, safety precautions, and legal considerations associated with hogtie use.

Reasonable Force

Hogties can only be used as a reasonable and necessary force to restrain an individual who poses an immediate threat to themselves, others, or property.

Informed Consent

If possible, officers should obtain informed consent from the individual before hogtying them. However, this may not always be feasible in emergency situations.

Medical Considerations

Officers must be aware of any medical conditions that may be affected by hogtie use, such as respiratory issues or cardiovascular disease. If an individual has any known conditions, medical professionals should be consulted before hogtying.

Documentation

Officers must thoroughly document every instance of hogtie use, including the reason, duration, and any observations or incidents that occurred.

Reviews and Audits

Hogtie use is subject to regular reviews and audits to ensure compliance with protocols and identify areas for improvement.

Special Considerations for Hogtie Tightness

The proper tightness of a hogtie is crucial for safety. It should be tight enough to restrain the individual but not so tight as to cause injury or impair circulation. Officers should monitor the individual’s condition regularly and adjust the tightness if necessary.

Level of Tightness Description Purpose
Snug Allows for slight finger insertion between the rope and body Standard restraint
Moderate Allows for thin object insertion between the rope and body Increased restraint for resistant individuals
Firm Allows for insertion of one fingernail between the rope and body Maximum restraint for violent or dangerous individuals

Officers must avoid applying excessive pressure, especially in areas such as the groin, neck, and head.

Alternatives to Hogtie

In certain situations, it may be necessary to restrain an individual without resorting to a hogtie. Here are several alternatives to hogtie:

Handcuffs

Handcuffs are a secure and non-restrictive method of restraint. They can be applied quickly and easily, and they allow the individual to retain a degree of mobility. However, handcuffs can be uncomfortable if worn for extended periods.

Soft Restraints

Soft restraints, such as straps or belts, can be used to secure an individual’s limbs. They are less restrictive than handcuffs, but they may not be as secure. Soft restraints should be used with caution, as they can cause injury if they are applied too tightly.

Positional Restraint

Positional restraint involves placing an individual in a position that restricts their movement. This can be done by using a prone position, a side-lying position, or a seated position. Positional restraint should only be used for short periods of time, as it can be uncomfortable and may lead to injury.

Chemical Restraint

Chemical restraint involves the use of medication to sedate an individual. This is a last resort option that should only be used when other methods of restraint have failed. Chemical restraint can have serious side effects, so it should only be administered by a healthcare professional.

Table of Alternative Restraint Options:

Method Security Level Comfort Level
Handcuffs High Low
Soft Restraints Medium Medium
Positional Restraint Low Low
Chemical Restraint High Low

Ethical Considerations for Hogtie

Hogtie is a restraint technique that involves binding someone’s wrists and ankles together behind their back. It is a controversial technique that has been used by law enforcement and military personnel for centuries. However, there are serious ethical concerns about the use of hogtie. These concerns include:

  1. Risk of injury: Hogtie can put excessive pressure on the joints and muscles, which can lead to pain, injury, or even paralysis.

  2. Restriction of movement: Hogtie can make it difficult for the person being restrained to move, which can lead to discomfort, anxiety, and panic.

  3. Loss of dignity: Hogtie can be a humiliating and degrading experience, which can damage the person’s self-esteem.

  4. Racial bias: Studies have shown that hogtie is used disproportionately against people of color, which raises concerns about racial bias in law enforcement.

  5. Lack of training: Many law enforcement officers are not properly trained in how to use hogtie, which can increase the risk of injury.

    Alternatives to Hogtie
    • Handcuffs
    • Zip ties
    • Soft restraints
    • Verbal de-escalation
    • Physical restraint without hogtie

      In light of these ethical concerns, it is important to consider the use of alternatives to hogtie whenever possible. There are a number of less restrictive and less dangerous alternatives that can be used to restrain someone safely and effectively.

7 Effortless Steps to Create Your Own Homemade Boxing Bag

5 Ways to Master Shark Man Karate

Are you an avid boxer looking to hone your skills without breaking the bank? Consider crafting your own homemade boxing bag. Not only is it a cost-effective solution, but it also offers the flexibility to customize the bag’s weight, size, and firmness to your specific needs. Embark on this rewarding project and elevate your boxing experience to new heights.

To begin your DIY endeavor, gather essential materials such as a durable fabric (canvas, vinyl, or leather), heavy-duty thread and needle, stuffing material (old clothes, shredded fabric, or sand), and a sturdy chain or rope for hanging. Determine the desired size and shape of your bag, and cut the fabric accordingly. Use strong stitching to secure the sides and bottom of the bag, ensuring it can withstand the rigorous demands of your workouts.

Next, fill the boxing bag with your chosen stuffing material. Adjust the amount of filling to achieve the desired weight and firmness. Once filled, securely close the top of the bag with additional stitching or a zipper. To complete the setup, attach a sturdy chain or rope to the top of the bag, enabling you to hang it from a ceiling beam or boxing stand. With your homemade boxing bag now ready, you can commence your training and reap the benefits of a personalized workout experience.

Selecting the Right Materials

When choosing materials for your homemade boxing bag, certain considerations are crucial to ensure durability and functionality.

Fabric

The ideal fabric for a boxing bag is a heavy-duty material that can withstand repeated impacts. Consider using canvas, leather, or synthetic fabrics like nylon or polyester. Canvas is a durable and breathable option, while leather provides exceptional longevity. Synthetic fabrics offer a balance of durability and affordability.

Filling

The filling material influences the weight and firmness of your boxing bag. Common options include sand, sawdust, rags, or rubber chips. Sand provides excellent weight but can shift over time, potentially creating an uneven surface. Sawdust is lightweight and economical, but it can also absorb moisture and become moldy. Rags are a versatile filling that can be adjusted to achieve the desired firmness. Rubber chips are a durable and resilient option that provides consistent feedback during use.

Size and Weight

The size and weight of your boxing bag depend on your height, weight, and training goals. For beginners, a bag weighing between 60 and 80 pounds with a length of approximately 48 inches is a suitable starting point. As you progress, you can gradually increase the weight and size to challenge yourself further.

Fabric Filling Size Weight
Canvas, leather, nylon, polyester Sand, sawdust, rags, rubber chips 48 inches (beginners) 60-80 pounds (beginners)

Gathering the Necessary Equipment

Before you embark on your homemade boxing bag adventure, it’s essential to gather the right materials. Here’s a detailed breakdown of everything you’ll need:

4. Materials for the Bag’s Outer Covering

To ensure durability and longevity, the bag’s outer covering should be made of sturdy materials. Here are some popular options along with their approximate prices:

Material Approximate Price
Canvas $10-$15 per yard
Vinyl $15-$20 per yard
Leather $20-$30 per square foot

Remember that the price may vary depending on the quality and thickness of the material.

Additional materials to consider for the outer covering include:

  • Reinforcement webbing: Provides extra support to the seams and stress points.
  • Zipper: Allows you to easily add or remove filling.
  • Grommets: For attaching the bag to a suspension system.

Preparing the Bag’s Interior

Filling the boxing bag is essential for providing resistance and impact absorption. You can use various materials to achieve the desired weight and firmness. Here are various options to consider:

Fabric Scraps:

Old clothing, towels, and blankets can be repurposed as inexpensive fillers. They offer moderate density, making them suitable for beginners.

Rubber or Plastic Pellets:

Plastic and rubber pellets provide a denser and more durable filling. They are less bulky than fabric scraps and can be found at craft stores or online.

Sand or Rice:

Sand or rice offers a heavy and compact filling. However, it can be messy to work with and may require a double layer of fabric for containment.

Wood Chips or Sawdust:

Wood chips or sawdust are natural and biodegradable materials that provide a firm and absorbent filling. They are suitable for outdoor bags but may attract insects or pests.

Consider the following factors when selecting your filling:

Material

Density

Durability

Messiness

Cost

Fabric Scraps

Moderate

Low

Low

Low

Rubber or Plastic Pellets

High

High

Moderate

Variable

Sand or Rice

Very High

Moderate

Very High

Low

Wood Chips or Sawdust

Moderate

Moderate

Low

Variable

Securing the Bag’s Closure

Once you’ve filled and weighed your bag, it’s time to secure the closure. Here are some methods you can use:

1. Lace-Up Closure

This is a common method used on commercial punching bags. It involves threading a rope or cord through a series of holes around the top of the bag and tightening it to create a snug fit.

2. Velcro Closure

Velcro is a convenient and easy-to-use option. Sew a strip of Velcro around the top of the bag and the corresponding strip to the inside of the closure flap.

3. Zipper Closure

A zipper provides a sturdy and secure closure. Sew a heavy-duty zipper around the top of the bag, ensuring the zipper pull is large enough for ease of use.

4. Snap Closure

Snap closures are quick and simple to use. Attach a series of snap buttons around the top of the bag and the inside of the closure flap.

5. Buckle Closure

Buckles offer a secure and adjustable closure. Sew a buckle to the top of the bag and the corresponding strap to the closure flap.

6. Table of Closure Methods

| Closure Method | Advantages | Disadvantages |
|—|—|—|
| Lace-Up | Durable, adjustable | Time-consuming to secure |
| Velcro | Convenient, easy to access | May not withstand heavy use |
| Zipper | Strong, secure | Can be expensive |
| Snap | Quick, inexpensive | May not hold up to excessive force |
| Buckle | Adjustable, secure | Can be bulky |

Stabilizing the Bag for Optimal Use

1. Securely Hang the Bag

Ensuring the bag is well-anchored is crucial. Use sturdy hooks, chains, or straps to suspend it from a stable structure like a beam or ceiling joist. Avoid hanging it directly from the ceiling, as it can lead to excessive swaying.

2. Distribute the Weight Evenly

If the bag is filled with sand or similar materials, ensure the weight is distributed evenly throughout. Otherwise, it will sway unevenly, affecting your training.

3. Use a Bottom Platform

Placing a platform or mat under the bag adds stability and prevents it from tipping over. Heavy-duty rubber mats or wooden platforms are suitable options.

4. Adjust the Height

The bag should hang at an appropriate height for your comfort. For most users, the ideal height is with the top of the bag at chest level.

5. Fix Swivels or Chains

If you want the bag to move freely, attach swivels or chains to the hanging point. This will prevent the cords or straps from getting tangled and allow the bag to rotate for realistic impact.

6. Use a Ceiling Mount

A ceiling mount provides a robust and stable mounting option, especially for heavy bags. It distributes the weight over a larger area, eliminating the risk of the bag falling or swaying excessively.

7. Counterweight the Bag

For freestanding heavy bags, adding a counterweight at the base improves stability. Sandbags or heavy plates can be attached to the bottom to prevent the bag from toppling over.

8. Reinforcement Techniques

For added stability, consider the following reinforcements:

Technique Description
Double-Bag System Using two bags with a chain or rope connecting them.
Angle Irons Attaching metal angle irons to the walls and connecting them to the bag’s mounting point.
Wall Brackets Installing sturdy brackets on the wall and mounting the bag directly to them.

Conditioning the Bag for Durability

To ensure the longevity of your homemade boxing bag, it’s essential to condition the materials following these steps:

1. Apply a Primer: Begin by applying a thin layer of primer to the fabric or canvas. This will help seal the material and prevent fraying.

2. Allow to Dry: Let the primer dry completely before proceeding to the next step.

3. Apply a Sealant: Use a waterproof sealant specifically designed for textiles. Apply a generous layer to the entire surface of the bag, paying attention to the seams.

4. Hang to Dry: Suspend the bag in a well-ventilated area and allow the sealant to dry thoroughly.

5. Cure the Bag: Once the sealant is completely dry, wrap the bag in plastic wrap and let it sit for a few days to cure properly.

6. Unwrap and Inspect: After the curing process, unwrap the bag and inspect it for any cracks or imperfections. If necessary, apply an additional layer of sealant.

7. Fill the Bag: Fill the bag with the desired weight using old clothes, shredded paper, or sand.

8. Hang and Use: Hang the bag securely and start using it for boxing training.

Additional Tips

9. Regular Maintenance: Regularly inspect the bag for any damage and seal any tears or punctures promptly to prevent further deterioration.

Conditioning Agent Benefits
Primer Seals the material, prevents fraying
Sealant Waterproofs, protects against wear and tear
Plastic Wrap Cures the sealant, enhances durability

Putting It All Together

Now that you have all the materials, it’s time to put it all together. Start by filling your bag with rags, shredded foam, or other stuffing. Make sure to fill it tightly so that it’s firm but not too hard. Then, sew or duct tape the opening closed.

Hanging the Bag

Once your bag is filled, you need to hang it up. You can do this using a chain, rope, or other heavy-duty material. Make sure to hang it in a location where you have enough room to move around and won’t be disturbed by others.

Maintaining and Cleaning the Bag

Maintaining the Bag

To maintain your boxing bag, you should regularly check for any tears or holes. If you find any, repair them immediately to prevent further damage. You should also clean the bag regularly to remove sweat and dirt. To clean the bag, simply wipe it down with a damp cloth.

Cleaning the Bag

To properly clean your boxing bag, you should use a mild detergent and a damp cloth. Wipe down the entire bag, making sure to get into all the nooks and crannies. Rinse the bag thoroughly with clean water and then allow it to air dry.

If your bag is particularly dirty, you may need to use a stronger cleaning solution. However, be sure to test the solution on a small area of the bag first to make sure it doesn’t damage the material.

Tips for Cleaning Your Boxing Bag:

  1. Use a mild detergent and a damp cloth.
  2. Wipe down the entire bag, including the inside and outside.
  3. Rinse the bag thoroughly with clean water.
  4. Air dry the bag completely.

By following these simple steps, you can keep your boxing bag clean and in good condition for years to come.

How to Make a Homemade Boxing Bag

Looking for a fun and challenging workout? Making your own boxing bag is a great way to get started. It’s a relatively simple project that can be completed in a few hours with just a few materials.

Here’s what you’ll need:

  1. A heavy-duty canvas or burlap bag
  2. A length of chain or rope
  3. A hook or eye bolt
  4. Sand or rice
  5. Duct tape

Instructions:

  1. Fill the bag with sand or rice. Leave about 6 inches of space at the top of the bag.
  2. Tie the bag closed with duct tape.
  3. Attach the chain or rope to the top of the bag.
  4. Hang the bag from a hook or eye bolt in a secure location.

Your homemade boxing bag is now complete! Enjoy working out and getting in shape.

People Also Ask

How much does it cost to make a homemade boxing bag?

The cost of making a homemade boxing bag will vary depending on the materials you use. However, it should be possible to make a bag for around $20-$30.

What is the best material to use for a homemade boxing bag?

The best material to use for a homemade boxing bag is a heavy-duty canvas or burlap. These materials are durable and can withstand the impact of punches.

How do I hang a homemade boxing bag?

To hang a homemade boxing bag, you will need to attach a chain or rope to the top of the bag and then hang it from a hook or eye bolt in a secure location.