Skip to content

flexco.com

Tag: login

1 Easy Step to Login to Xbox Live on Xbox 360

1 Easy Step to Login to Xbox Live on Xbox 360

1 Easy Step to Login to Xbox Live on Xbox 360

Featured Image: $title$

Xbox Live, an indispensable online gaming platform for Xbox consoles, offers seamless access to a vast array of multiplayer experiences, social interaction, and entertainment apps. If you own an Xbox 360, unlocking the immersive world of Xbox Live is essential to fully capitalize on your gaming experience. In this comprehensive guide, we will delve into the straightforward process of signing into Xbox Live on your Xbox 360 console.

To begin your Xbox Live odyssey, you’ll need a valid Microsoft account. If you already possess one, you’re ready to proceed with the login process. If not, creating a Microsoft account is a quick and effortless endeavor. Simply navigate to the “Create an Account” page and follow the on-screen instructions. With your Microsoft account in place, you can now embark on the next crucial step: linking it to your Xbox 360 console. To achieve this, power on your console and ensure it has an active internet connection. Proceed to the “My Xbox” section and select “Sign In.” Choose the “Add New” option and input the credentials associated with your Microsoft account. Once you’ve successfully linked your account, you’ll be able to bask in the full glory of Xbox Live.

Xbox Live unlocks a treasure trove of gaming possibilities. Engage in thrilling multiplayer battles with friends or adversaries from around the globe, showcase your gaming prowess on leaderboards, and connect with fellow gamers via voice and text chat. Additionally, you’ll gain access to a plethora of entertainment apps, such as Netflix, Amazon Prime Video, and Hulu, transforming your Xbox 360 into a versatile entertainment hub. With Xbox Live, the boundaries of gaming and entertainment seamlessly merge, elevating your experience to unprecedented heights.

How to Log In to Xbox Live on Xbox 360

Xbox Live is an online multiplayer gaming and digital media delivery service created and operated by Microsoft. It allows Xbox 360 users to play games, watch movies, listen to music, and connect with friends online.

To log in to Xbox Live on Xbox 360, follow these steps:

1. Turn on your Xbox 360 console.
2. Press the “Guide” button on your controller.
3. Select “Sign In” from the menu that appears.
4. Enter your Xbox Live email address and password.
5. Select “Sign In” to log in to your Xbox Live account.

People Also Ask

How do I create an Xbox Live account?

You can create an Xbox Live account for free by visiting the Xbox website. Once you have created an account, you will be able to log in to Xbox Live on your Xbox 360 console.

I forgot my Xbox Live password. What can I do?

If you have forgotten your Xbox Live password, you can reset it by visiting the Xbox website. Once you have reset your password, you will be able to log in to Xbox Live on your Xbox 360 console.

I am having trouble logging in to Xbox Live. What should I do?

If you are having trouble logging in to Xbox Live, you can try the following:

  • Make sure that you are using the correct email address and password.
  • Check your internet connection.
  • Restart your Xbox 360 console.

If you are still having trouble, you can contact Xbox Support for help.

Author sadminPosted on December 2, 2025Categories howtoTags connect-to-internet, create-account, login, sign-in, troubleshooting, xbox-360, xbox-live

5 Steps to Disable Two-Factor Authentication on Instagram

1 Easy Step to Login to Xbox Live on Xbox 360

1 Easy Step to Login to Xbox Live on Xbox 360

Two-factor authentication (2FA) is an extra layer of security that helps protect your Instagram account from unauthorized access. However, if you’ve enabled it and now need to disable it, you may be wondering how to do so. Whether you’re selling your device or changing your phone number, disabling 2FA on Instagram is a straightforward process. This step-by-step guide will provide you with clear instructions on how to do it quickly and easily, ensuring the seamless management of your account.

To disable 2FA on Instagram, you’ll need to access your account settings. Once there, navigate to the “Security” tab, where you’ll find the “Two-Factor Authentication” option. If it’s currently enabled, you’ll see a green toggle next to it. Simply tap on the toggle to turn it off and disable 2FA. Instagram may prompt you to enter your password for verification purposes. After entering it, the 2FA feature will be successfully disabled from your account.

Disabling 2FA does not compromise the security of your Instagram account, but it does mean that you will no longer receive security codes via text message or authentication app when logging in. However, if you believe your account has been compromised or accessed by unauthorized individuals, it’s recommended to change your password immediately and enable 2FA again for enhanced protection. By following these steps, you can effectively manage the 2FA settings on your Instagram account, ensuring both convenience and security as needed.

$title$

Understanding Two-Factor Authentication on Instagram

Two-factor authentication (2FA) is a security measure that adds an extra layer of protection to your Instagram account by requiring you to provide two forms of identification when logging in. This helps to prevent unauthorized access to your account, even if your password is compromised.

On Instagram, 2FA works by sending a security code to your phone number or email address whenever you try to log in. You’ll need to enter this code along with your password to complete the login process.

There are several reasons why you should enable 2FA on your Instagram account:

  • It protects your account from unauthorized access, even if your password is compromised.
  • It makes it more difficult for hackers to take over your account and impersonate you.
  • It provides you with an additional layer of peace of mind knowing that your account is secure.

Enabling 2FA on Instagram is a simple process that takes only a few minutes. Here’s how to do it:

  1. Open the Instagram app and tap on your profile picture in the bottom right corner.
  2. Tap on the “Settings” icon in the top right corner.
  3. Scroll down and tap on “Security.”
  4. Tap on “Two-Factor Authentication.”
  5. Tap on the “Get Started” button.
  6. Choose how you want to receive your security codes: via text message or email.
  7. Enter your phone number or email address and tap on “Next.”
  8. You’ll receive a security code on your phone or email. Enter the code in the app and tap on “Confirm.”
  9. Once you’ve enabled 2FA, you’ll be required to enter a security code whenever you log in to your Instagram account on a new device or browser.

    It’s important to note that you should keep your phone number or email address up to date in your Instagram account settings in case you need to receive a security code. You should also consider using a password manager to generate and store strong passwords for your Instagram account and other online accounts.

    By following these steps, you can help protect your Instagram account from unauthorized access and keep your personal information safe.

    Step-by-Step Guide to Disabling Two-Factor Authentication

    Accessing Account Settings

    Step 1: Open the Instagram App

    Launch the Instagram app on your mobile device and log in to your account.

    Step 2: Navigate to Settings

    Tap on your profile picture in the bottom right corner of the screen to access your profile page. Then, tap on the three horizontal lines in the top right corner and select “Settings” from the menu.

    Step 3: Locate Security Center

    Scroll down in the Settings menu and tap on "Security Center." This section will provide various options related to your account security, including two-factor authentication.

    Step 4: Disable Two-Factor Authentication

    Under the "Two-Factor Authentication" section, you will see a toggle switch next to the option "Require Security Code." Tap on the switch to turn it off.

    Step 5: Confirm Your Identity

    Depending on your initial two-factor authentication setup, you may be prompted to enter your Instagram password or receive a security code via text message or email. Enter the required information to confirm your identity and complete the process.

    Two-Factor Authentication Method Verification Required
    Text Message Enter the security code received via SMS
    Email Click the verification link sent to your email address
    Authentication App Provide a one-time password generated by the authenticator app

    Checking Two-Factor Authentication Status

    Before disabling two-factor authentication, it’s crucial to verify that it’s currently enabled on your Instagram account. Here’s a step-by-step guide to check its status:

    1. Access Account Settings

    Log into your Instagram account and navigate to your profile page. Tap on the three horizontal lines at the top right corner to open the sidebar menu. Scroll down and select “Settings.”

    2. Navigate to Security Tab

    Within the “Settings” menu, tap on the “Security” tab. This section contains settings related to account privacy and security, including two-factor authentication.

    3. Review Two-Factor Authentication Status

    Under the “Login Security” section in the “Security” tab, you will find the “Two-Factor Authentication” option. If it’s enabled, you’ll see a green toggle switch and the message “Two-Factor Authentication is on.” If it’s disabled, the toggle switch will be grayed out and the message “Two-Factor Authentication is off” will be displayed.

    Status Toggle Switch Message
    Enabled Green Two-Factor Authentication is on
    Disabled Grayed Out Two-Factor Authentication is off

    Troubleshooting Common Issues with Disabling Two-Factor Authentication

    Forgot Backup Code

    If you’ve lost your backup codes, you’ll need to contact Instagram support to have them reset. Be prepared to provide proof of identity, such as a government-issued ID or a utility bill.

    Forgot Password

    You can reset your password through the Instagram website or app. If you’re having trouble resetting your password, contact Instagram support for assistance.

    Security Concerns

    Two-factor authentication is an important security measure. If you disable it, your account will be more vulnerable to hacking. If you’re concerned about the security of your account, consider enabling other security features, such as a strong password and a unique username.

    Other Issues

    If you’re experiencing any other issues with disabling two-factor authentication, you can contact Instagram support for assistance.

    Error Solution
    “Couldn’t disable two-factor authentication” Try again later. If the error persists, contact Instagram support.
    “Your account has been temporarily locked” Wait 24 hours before trying to disable two-factor authentication again.
    “Your account has been disabled” Contact Instagram support to have your account reinstated.

    Security Implications of Disabling Two-Factor Authentication

    Disabling two-factor authentication (2FA) on Instagram weakens your account’s security measures, making it more vulnerable to unauthorized access. Here are the key security implications:

    1. Increased Risk of Password Guessing or Brute-Force Attacks:

    Without 2FA, only a password is required to access your account. Passwords can be guessed, stolen through phishing attacks, or brute-forced using automated tools.

    2. Potential for Account Hijacking:

    If your password is compromised, attackers can gain full control over your account, changing your profile information, posting unauthorized content, and accessing private messages.

    3. Reduced Effectiveness of Password Reset Processes:

    With 2FA enabled, even if an attacker knows your password, they still need the additional verification code to reset it. Disabling 2FA makes password resets easier for unauthorized individuals.

    4. Loss of Access to Linked Accounts:

    Instagram allows you to link other accounts to it, such as Facebook or Twitter. Disabling 2FA makes it easier for attackers to gain access to those linked accounts as well.

    5. Lower Barrier to Social Engineering Attacks:

    Social engineering techniques involve manipulating users into revealing sensitive information or performing actions that compromise their accounts. Without 2FA, attackers can convince users to provide them with their Instagram passwords, making it easier to engage in phishing or other deceptive practices.

    The risks associated with disabling 2FA are significant and outweigh any perceived convenience or ease of access. It is strongly recommended to keep 2FA enabled for optimal account security.

    Disabling Two-Factor Authentication

    1. Open the Instagram app and go to your profile.
    2. Tap the three lines in the top right corner.
    3. Select “Settings.”
    4. Tap “Security.”
    5. Select “Two-Factor Authentication.”
    6. Turn off the toggle switch next to “Require Security Code.”

    Re-enabling Two-Factor Authentication if Needed

    To re-enable two-factor authentication, follow these steps:

    1. Go to your Instagram profile and tap the “Profile” icon.
    2. Tap the “Hamburger” icon in the top-right corner.
    3. Select “Settings” at the bottom of the menu.
    4. Tap “Security” in the “Account” section.
    5. Select “Two-Factor Authentication” in the “Login Security” section.
    6. Tap the “Get Started” button.
    7. Choose the method you want to use for two-factor authentication. You can select “Text Message” or “Authentication App.”
    8. Enter your phone number or authentication app code in the provided field.
    9. Tap the “Next” button.
    10. Instagram will send you a security code. Enter the code in the provided field.
    11. Tap the “Done” button.

    Two-factor authentication will now be re-enabled for your Instagram account.

    Tips for Maintaining Secure Instagram Accounts

    1. Create a Strong Password

    Your Instagram password should be long, complex, and hard to guess. Use a combination of upper and lowercase letters, numbers, and symbols. Avoid using personal information, like your name or birthdate.

    2. Enable Two-Factor Authentication

    Two-factor authentication (2FA) adds an extra layer of security to your Instagram account. When 2FA is enabled, you’ll need to enter a code from your phone or an authentication app in addition to your password when you log in.

    3. Be Cautious of Phishing Scams

    Phishing scams are emails or messages that look like they’re from Instagram, but are actually designed to trick you into giving up your password or other personal information. Never click on links in emails or messages from people you don’t know.

    4. Don’t Over-Share Personal Information

    It’s important to be careful about what personal information you share on Instagram. Don’t post your address, phone number, or other sensitive information.

    5. Review Your Privacy Settings

    Make sure your Instagram privacy settings are set to your liking. You can control who can see your posts, who can follow you, and what information is public.

    6. Be Careful Who You Follow

    Don’t follow people you don’t know. If someone you don’t know follows you, be suspicious and report them if you’re uncomfortable.

    7. Report Suspicious Activity

    If you see something suspicious on Instagram, such as a phishing scam or a fake profile, report it to Instagram.

    Action How to Do It
    Disable Two-Factor Authentication
  10. Go to your Instagram settings.
  11. Tap on “Security.”
  12. Tap on “Two-Factor Authentication.”
  13. Tap on “Disable.”

    Disable Two-Factor Authentication (2FA) on Instagram

    To disable 2FA on Instagram, open the app and navigate to your profile page. Tap the three lines in the top right corner, then scroll down and tap “Settings.” Under “Security,” tap “Two-Factor Authentication” and then “Disable.” You’ll be prompted to enter your password to confirm.

    Alternative Security Measures to Consider

    Use a Strong Password

    A strong password is the first line of defense against unauthorized access to your account. It should be at least 12 characters long and include a mix of upper and lowercase letters, numbers, and symbols.

    Enable Login Alerts

    Login alerts notify you when someone logs into your account from a new device or location. This can help you quickly identify any suspicious activity and take action to protect your account.

    Use a Password Manager

    A password manager can help you create and store strong passwords for all of your online accounts. This can make it easier to remember your passwords and protect your account from being compromised.

    Be Cautious of Phishing Scams

    Phishing scams are designed to trick you into entering your login credentials on a fake website. Be wary of any emails or messages that ask you to click on a link or enter your password.

    Regularly Review Account Activity

    Regularly reviewing your account activity can help you identify any suspicious activity. You can check your login history and device list in the “Security” section of your Instagram settings.

    Use a VPN

    A virtual private network (VPN) can help protect your online privacy by encrypting your internet traffic and hiding your IP address. This can make it more difficult for attackers to track your online activity or access your personal information.

    Enable Account Recovery Options

    In the event that you lose access to your account, it’s important to have account recovery options set up. This can include providing a backup email address or phone number.

    Monitor Your Credit

    If you’re concerned that your account may have been compromised, it’s a good idea to monitor your credit report for any unauthorized activity. You can get a free credit report from each of the three major credit bureaus once per year.

    Best Practices for Password Management

    In this digital age, it’s more important than ever to protect your passwords. Here are some best practices for password management:

    **1. Use a strong password.**

    A strong password should be at least 12 characters long and include a mix of upper and lowercase letters, numbers, and symbols.

    **2. Don’t use the same password for multiple accounts.**

    If one of your accounts is compromised, a hacker could gain access to all of your other accounts if you use the same password for all of them.

    **3. Store your passwords securely.**

    Don’t write your passwords down on a piece of paper or store them in a text file on your computer. Instead, use a password manager to generate and store your passwords securely.

    **4. Be careful when sharing your passwords.**

    Only share your passwords with people you trust. If you need to share a password with someone, use a secure method, such as a password manager.

    **5. Change your passwords regularly.**

    It’s a good idea to change your passwords every few months, especially if you use the same password for multiple accounts.

    **6. Be aware of phishing scams.**

    Phishing scams are emails or text messages that look like they’re from a legitimate company, but they’re actually designed to trick you into giving up your password.

    **7. Use two-factor authentication.**

    Two-factor authentication requires you to enter a code from your phone or email in addition to your password when you log in to your account. This makes it much harder for hackers to access your account.

    **8. Keep your software up to date.**

    Software updates often include security patches that can help protect your passwords from being compromised.

    **9. Be aware of social engineering attacks.**

    Social engineering attacks are when a hacker tries to trick you into giving up your password or other sensitive information. They may do this by posing as a customer service representative, a friend, or another person you trust.

    Protecting Your Instagram Data from Compromise

    1. Disable Two-Factor Authentication

    **10. Confirm the Disablement Process**

    Once you’ve entered your login credentials and received the verification code, you’ll be prompted to confirm that you want to disable two-factor authentication. Carefully review the details displayed on the screen to ensure accuracy. Then, click on the “Disable” button to complete the process. Upon successful disablement, you’ll receive a notification confirming the change.

    2. Update Your Login Credentials

    Regularly updating your login credentials is crucial for enhancing account security. Choose a strong and unique password containing a combination of uppercase, lowercase, numbers, and special characters. Avoid using common or easy-to-guess passwords that could be vulnerable to brute-force attacks.

    3. Enable Login Notifications

    Turn on login notifications to receive alerts whenever someone attempts to access your account from an unrecognized device or location. This allows you to promptly detect and address any suspicious activity to prevent unauthorized access.

    4. Review Logged-In Devices

    Periodically check the list of devices that have accessed your Instagram account. If you notice any unfamiliar or unrecognized devices, remove them immediately to revoke their access. This prevents potential attackers from exploiting compromised devices to gain access to your account.

    5. Monitor Account Activity

    Keep a close eye on your account activity, including posts, comments, likes, and messages. Promptly flag and report any unauthorized or suspicious activity to Instagram to prevent further compromise.

    6. Use a Password Manager

    Utilize a reputable password manager to securely store and manage your Instagram and other account passwords. This helps prevent password theft and makes it easier to create and maintain strong, unique passwords for each account.

    7. Enable Email and Phone Number Verification

    Ensure that your email address and phone number associated with your Instagram account are up-to-date and secure. This allows Instagram to send verification codes and security alerts to your trusted devices, making it harder for attackers to gain unauthorized access.

    8. Report Phishing Attempts

    Be vigilant against phishing scams that attempt to trick you into revealing your login credentials. Never click on links or open attachments in suspicious emails or messages that claim to be from Instagram. Report such attempts promptly to Instagram to help protect other users.

    9. Educate Yourself

    Stay informed about the latest online security threats and best practices. Attend webinars, read security blogs, and consult reputable sources to enhance your knowledge and protect yourself from emerging risks.

    How to Disable Two Factor Authentication on Instagram

    To disable two-factor authentication (2FA) on Instagram:

    1. Open the Instagram app on your phone.
    2. Tap your profile picture in the bottom right corner.
    3. Tap the three lines in the top right corner.
    4. Tap “Settings.”
    5. Tap “Security.”
    6. Tap “Two-Factor Authentication.”
    7. Enter your password.
    8. Tap “Turn Off Two-Factor Authentication.”

    You will no longer be required to enter a security code when you log in to Instagram.

    People Also Ask

    Is it safe to disable 2FA on Instagram?

    Disabling 2FA makes it easier for someone to gain access to your account if they have your password, so it is generally not recommended to disable it.

    How can I recover my Instagram account if I disable 2FA and lose my phone?

    If you disable 2FA and lose your phone, you will not be able to receive the security code necessary to log in to your account. You will need to contact Instagram support to recover your account.

    Can I use 2FA on Instagram without a phone number?

    Yes, you can use 2FA on Instagram without a phone number by using an authentication app like Google Authenticator or Authy.

Author sadminPosted on March 2, 2025Categories howtoTags disable, instagram, instagram-security, login, security, two-factor-authentication, two-step-verification, verification

5 Essential Steps to Obtain the Facebook Code Generator

1 Easy Step to Login to Xbox Live on Xbox 360

1 Easy Step to Login to Xbox Live on Xbox 360

Featured Image: [Image of a computer screen with the Facebook login page and a code generator displayed]

In today’s digital age, safeguarding your online accounts is paramount. With Facebook being one of the most popular social media platforms, it’s essential to ensure that your account is protected from unauthorized access. One effective way to enhance security is to use a code generator, an additional layer of protection that helps prevent unauthorized login attempts. Whether you’re concerned about potential phishing scams or simply want to maximize the security of your Facebook account, acquiring and utilizing a code generator is a vital step towards safeguarding your digital identity.

To obtain the code generator, you must access your Facebook account settings. Once you’re in the settings menu, navigate to the “Security and Login” section and select the “Two-Factor Authentication” tab. Here, you’ll find various authentication methods, including the code generator. Click on the “Set Up” button and follow the on-screen instructions. The code generator will typically consist of a series of random numbers that change frequently. Keep in mind that you’ll need to have a compatible security app installed on your mobile device to access the code generator. Ensure that the app is authentic and reputable before proceeding.

Once you’ve successfully set up the code generator, you’ll need to save the backup codes provided by Facebook. These codes serve as a contingency plan in case you lose access to your phone or the security app. Store the backup codes in a secure location, separate from your mobile device. Remember, having a code generator enabled for your Facebook account significantly enhances its security, minimizing the risk of unauthorized access. Utilize this valuable tool to protect your online presence and safeguard your personal information.

Identifying Your Motivation for Code Generation

Understanding your reasons for wanting to generate code is crucial before diving into the technicalities. Here are some key motivations to consider:

Time and Effort Optimization

Code generation automates the tedious and time-consuming task of manually writing code. This frees up developers to focus on more complex and creative aspects of software development, ultimately resulting in increased productivity and efficiency.

For instance, consider a scenario where you need to create a complex API with multiple endpoints. Manually writing the repetitive code for each endpoint can be labor-intensive. Code generation tools can automate this process, saving you significant time and effort.

Error Minimization

Code generation eliminates human error, which is often introduced during manual coding. Automated code generators adhere to strict syntax and formatting rules, ensuring accuracy and consistency. This reduced error rate leads to more reliable and robust software systems.

To illustrate, imagine manually writing a large number of SQL queries. The chances of introducing syntax errors or inconsistencies are high. A code generator can automatically generate these queries based on predefined rules, minimizing the risk of errors and ensuring data integrity.

Enhanced Code Reusability

Code generation promotes code reusability by centralizing the generation of common code modules. This allows developers to reuse these modules in multiple projects, reducing redundancy and maintaining code consistency. The standardized nature of generated code also facilitates maintenance and updates.

For example, in a large codebase with multiple developers, maintaining consistency in naming conventions and coding styles can be challenging. A code generator can enforce these standards, ensuring that all generated code conforms to the same guidelines, leading to improved code readability and maintainability.

“`html

Troubleshooting Common Issues with Code Generation

1. Error: The code generator is not working.

If you are experiencing issues with the code generator, ensure that you have the latest version installed. Additionally, check if your internet connection is stable, as an unstable connection can interfere with the code generation process.

2. Error: The generated code is not working.

If the generated code is not functioning as intended, verify that you have correctly implemented it in your application. Review the code for any typos or errors that may have occurred during integration.

3. Error: I am getting an error message.

If you receive an error message while using the code generator, note the specific error and refer to the documentation or online resources for troubleshooting guidance.

4. Error: The code generator is not compatible with my system.

Ensure that your system meets the minimum requirements for running the code generator. Check if the generator is compatible with your operating system and software versions. If necessary, upgrade your system or consult the documentation for specific system requirements.

5. Error: I am unable to access the code generator.

If you encounter issues accessing the code generator, verify that you have the necessary permissions and authorization to use it. Check with your administrator or consult the documentation for instructions on granting access. Alternatively, contact the support team for assistance.

Possible Cause Solution
Incorrect network settings Configure your firewall or proxy settings to allow access to the code generator.
Browser cache issues Clear your browser cache and refresh the page.
Temporary server outage Wait a few minutes and try again. Contact support if the issue persists.

“`

Best Practices for Using the Code Generator Effectively

1. Use strong and unique passwords

When creating your Facebook app, be sure to use a strong and unique password. This will help protect your app from unauthorized access.

2. Limit the scope of your app

When you create your app, you will be asked to specify the permissions that it will need. Only request the permissions that are absolutely necessary for your app to function. This will help reduce the risk of your app being compromised.

3. Use the code generator regularly

The code generator can generate new codes every 30 seconds. It is a good practice to generate a new code every time you use your app. This will help ensure that your app is always using the most up-to-date code.

4. Store your codes securely

Once you have generated a code, be sure to store it securely. Do not share your code with anyone, and do not store it in a place where it could be easily accessed by others.

5. Only use the code generator on trusted devices

When you install the code generator on a new device, be sure to verify that the device is trusted. Do not install the code generator on a device that you are not familiar with or that you do not trust.

6. Monitor your app’s activity

It is important to monitor your app’s activity to ensure that it is not being compromised. If you notice any suspicious activity, be sure to report it to Facebook immediately.

Here are some additional tips for using the code generator effectively:

  • Use a password manager to store your codes securely.
  • Enable two-factor authentication for your Facebook account.
  • Be aware of social engineering attacks and do not share your codes with anyone.

Ensuring Compatibility with Facebook’s Platform

Before using the code generator for Facebook, it is important to ensure that your application is compatible with Facebook’s platform. This involves adhering to the guidelines and specifications set by Facebook.

Here are some key aspects to consider:

Authentication and Authorization

Your application must be able to authenticate and authorize users to access their Facebook data. The code generator provides methods for integrating Facebook’s authentication and authorization process.

Data Retrieval

The code generator facilitates the retrieval of data from Facebook’s APIs. Ensure that your application correctly handles the data retrieval process and adheres to Facebook’s data policies.

Data Manipulation

The code generator provides methods for manipulating data retrieved from Facebook’s APIs. Your application should use these methods appropriately and respect Facebook’s data usage limitations.

Privacy Compliance

It is crucial that your application complies with Facebook’s privacy policies. The code generator includes features to help you handle user privacy and data protection.

Event Handling

Facebook allows you to subscribe to events and receive notifications. The code generator provides support for event handling, enabling your application to react to these events.

Testing and Debugging

Thoroughly test your application to ensure it functions as expected. The code generator provides tools for debugging and troubleshooting common issues.

Version Control

Facebook’s platform is constantly evolving, so it is important to keep your code generator up to date. Monitor Facebook’s developer documentation for updates and ensure your application is using the latest version.

Additional Resources

Facebook provides a range of resources to support developers, including documentation, tutorials, and community forums. Leverage these resources to ensure your application’s compatibility with Facebook’s platform.

Resource Description
Developer Documentation Official documentation on Facebook’s APIs and platform
Tutorials Step-by-step guides on integrating with Facebook
Community Forums Platforms for developers to connect and exchange knowledge

Optimizing Code Generation for Efficiency

Optimizing code generation for efficiency is crucial to ensure fast and responsive applications. The following strategies can help enhance the efficiency of code generation:

1. Caching

Caching frequently generated code can significantly reduce the time required for subsequent code generation requests. By storing the generated code in a cache, the system can bypass the code generation process, leading to faster response times.

2. Profiling

Profiling the code generation process helps identify bottlenecks and areas where optimizations can be applied. Tools like profilers can provide detailed information about the time spent in different parts of the code generation pipeline.

3. Parallelization

If the code generation process is parallelizable, leveraging multiple processors or cores can speed up the generation process. This can be achieved by breaking down the code generation task into smaller chunks that can be executed concurrently.

4. Code Reuse

Reusing existing code instead of generating new code can save time and improve efficiency. Identifying and storing commonly generated code snippets as templates or libraries can help avoid unnecessary code generation.

5. Code Optimization

Optimizing the generated code itself can enhance its efficiency. Techniques like dead code elimination, constant propagation, and loop unrolling can help reduce the size and improve the performance of the generated code.

6. Incremental Code Generation

In scenarios where changes to the source code are incremental, using incremental code generation can be beneficial. This approach only generates the code for the modified portions, saving time and resources compared to regenerating the entire codebase.

7. Just-in-Time Compilation

Just-in-Time (JIT) compilation compiles code at runtime, which can offer performance improvements. By compiling code only when it is needed, JIT compilation avoids unnecessary compilation overhead and improves application startup time.

8. Virtualization

Virtualization techniques can help separate the code generation process from the execution environment. This allows code to be generated and tested in a controlled environment, leading to improved efficiency and maintainability.

9. Code Generation as a Service

Leveraging third-party code generation services can offload the code generation process to specialized platforms. These services often provide optimized and scalable code generation capabilities, reducing the burden on in-house development teams and enabling them to focus on core application logic. The following table summarizes the benefits and drawbacks of using a code generation service:

Benefits Drawbacks
Code Generation as a Service – Reduced development time and effort
– Access to optimized code generation algorithms
– Improved scalability and performance
– Potential costs associated with the service
– Reduced control over the code generation process
– Security concerns if sensitive data is involved

How To Get The Code Generator For Facebook

The code generator is a security feature that helps protect your Facebook account from unauthorized access. It generates unique codes that can be used to log in to your account even if you don’t have your password. To get the code generator, you need to have a Facebook account and a mobile phone.

Here are the steps on how to get the code generator for Facebook:

  1. Open the Facebook app on your mobile phone.
  2. Tap on the menu icon in the bottom right corner of the screen.
  3. Scroll down and tap on "Settings & Privacy."
  4. Tap on "Security and Login."
  5. Under "Two-Factor Authentication," tap on "Code Generator."
  6. Tap on "Get Code Generator."
  7. Enter your Facebook password and tap on "Continue."
  8. The code generator will now be displayed on your screen.

Once you have the code generator, you can use it to log in to your Facebook account even if you don’t have your password.

To do this, simply follow these steps:

  1. Open the Facebook app on your mobile phone.
  2. Enter your email address or phone number and tap on "Continue."
  3. Tap on "Use Code Generator."
  4. Enter the code that is displayed on the code generator and tap on "Continue."
  5. You will now be logged in to your Facebook account.

People also ask:

How do I use the code generator?

To use the code generator, simply open the app and enter the code that is displayed on the screen.

What if I lose my phone?

If you lose your phone, you can still use the code generator by logging in to your Facebook account on a computer.

How often does the code generator change?

The code generator changes every 30 seconds.

Author sadminPosted on February 27, 2025Categories howtoTags account-protection, authentication, code-generator, facebook, login, password, security, two-factor-authentication

5 Steps to Recover Your Disabled Facebook Account

5 Steps to Recover Your Disabled Facebook Account

Disabled Facebook Account

In the digital realm where billions of users entrust their data, the recent Facebook hack sent shockwaves through the online community. With accounts breached and profiles disabled, the prospect of recovery seemed daunting. However, amidst the chaos, a beacon of hope emerged, offering guidance to victims seeking to reclaim their digital identities from the clutches of cybercriminals. This comprehensive guide will unravel the intricate steps involved in recovering a hacked and disabled Facebook account, empowering users to regain control over their online presence.

Understanding the nature of the hack is paramount in devising an effective recovery strategy. Cybercriminals often employ sophisticated techniques to compromise accounts, ranging from phishing scams to malware infections. To determine the root cause, users should thoroughly inspect their computer for any suspicious software or recent email communication containing malicious links. Once the source of the breach is identified, immediate action must be taken to prevent further damage. This may involve changing passwords, reporting compromised devices, and implementing stronger security measures to safeguard future interactions.

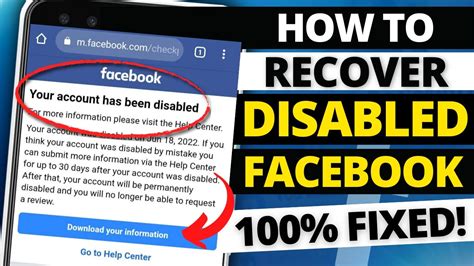
With the account disabled due to the hack, recovering access requires meticulous navigation through Facebook’s recovery process. Users will be prompted to provide identifying information, such as their name, email address, and phone number. Facebook may also request a government-issued ID to verify their identity. Submitting accurate and up-to-date information is crucial to ensuring a successful recovery. Patience is also advised, as the recovery process can take several days or even weeks to complete. By diligently following the steps outlined in Facebook’s recovery guidelines, users can increase their chances of regaining access to their accounts and restoring their digital presence.

Understanding the Facebook Hack and Its Impact

Facebook is one of the most popular social media platforms in the world, with billions of active users. As such, it is a prime target for hackers looking to steal personal data, spread malware, or disrupt communication.

The Anatomy of a Facebook Hack

Facebook accounts can be hacked in a variety of ways, including:

  • Phishing: A hacker sends you an email or text message that looks like it’s from Facebook, but is actually a fake attempt to steal your login information.
  • Malware: Malware is software that can be installed on your computer or device without your knowledge, and can steal your Facebook login information.
  • Exploits: Hackers can exploit vulnerabilities in Facebook’s software to gain access to user accounts.

Once a hacker has access to your Facebook account, they can do a variety of things, including:

  • Change your password and other account settings
  • Post spam or malicious content
  • Send messages to your friends and followers
  • Access your personal data, such as photos, videos, and messages

The impact of a Facebook hack can be significant. You could lose access to your account, your personal data could be compromised, and your reputation could be damaged.

Protecting Yourself from Facebook Hacks

There are a number of things you can do to protect yourself from Facebook hacks, including:

  • Be careful about the links you click on in emails and text messages.
  • Never give your password to anyone.
  • Use a strong password consisting of a mix of upper and lower case letters, numbers, and symbols.
  • Enable two-factor authentication to add an extra layer of security to your account.
  • Keep your software up to date. Software updates often include security patches that can help protect your account from hackers.
  • Be aware of the latest phishing scams. Hackers are always coming up with new ways to trick people into giving up their passwords, so it’s important to stay informed about the latest threats.

Immediate Steps to Take When Your Facebook Account is Hacked

1. Verify the breach

Start by checking for unusual activity on your account, such as unrecognized posts, messages, or login attempts from unfamiliar locations. If you notice any suspicious activity, take immediate action.

2. Secure your password

  1. Change your Facebook password promptly

    to prevent the hacker from regaining access. Create a new password that is complex and unique to Facebook.

  2. Check for compromised accounts

    by visiting haveibeenpwned.com and entering your email address. If any of your accounts have been compromised, change their passwords immediately.

  3. Enable two-factor authentication

    to add an extra layer of security to your account. This requires you to enter a code sent to your phone when logging in from a new device.

  4. Review your account settings

    and ensure that the correct email address and phone number are associated with your account. If the hacker has changed any settings, revert them back to their original values.

  5. Report the hack to Facebook

    by following the steps outlined on their help center. Providing detailed information about the incident will help Facebook investigate and recover your account.

3. Notify your friends and family

Inform your close contacts and family members about the hack to prevent potential fraud or scams. Explain that your account has been compromised and ask them to be wary of any suspicious messages or requests coming from you.

4. Monitor your financial activity

Keep a close eye on your financial accounts and credit report for unauthorized activity. If you notice any suspicious transactions, contact your banks or credit card companies immediately.

Reporting the Hack to Facebook Support

If you suspect your Facebook account has been hacked, the first step is to report it to Facebook Support. You can do this by visiting the following page:

https://www.facebook.com/hacked

Once you’re on the reporting page, you’ll be asked to provide some information about the hack, such as:

  • When you last had access to your account
  • What changes the hacker made to your account
  • Any suspicious emails or messages you received

You’ll also be asked to provide a government-issued ID to verify your identity. Once you’ve submitted all of the required information, Facebook will investigate the hack and take steps to secure your account.

Here are some additional tips for reporting a hack to Facebook Support:

  • Be as detailed as possible in your report.
  • Include any evidence you have of the hack, such as screenshots or emails.
  • Be patient. It may take Facebook some time to investigate the hack and regain access to your account.

Changing Your Password and Other Security Measures

If you’ve been hacked, your first step should be to secure your account. Here are the steps you need to take:

Resetting Your Password

Change your password immediately. Create a new, strong password that’s at least 12 characters long and includes a mix of upper and lowercase letters, numbers, and symbols. Avoid using common words or phrases.

Enabling Two-Factor Authentication

Turn on two-factor authentication to add an extra layer of security to your account. When you log in from a new device, you’ll need to provide a code sent to your phone or email. This makes it harder for hackers to access your account, even if they have your password.

Checking Your Account

Review your account activity and security settings. Check for any unauthorized activity or apps that you don’t recognize. Remove any apps or services that you don’t use.

Recovering Your Disabled Facebook Account

1. Understanding the Reason for Deactivation

Facebook typically deactivates accounts for violating its community standards or policies. Familiarize yourself with these guidelines to identify the potential reason for your account’s deactivation.

2. Submitting an Appeal

If you believe your account was deactivated by mistake, submit an appeal by following the instructions on the Facebook Help Center. Clearly explain your situation, provide supporting evidence if possible, and request for your account to be reactivated.

3. Waiting for a Response

After submitting your appeal, wait patiently for a response from Facebook. The review process can take several business days.

4. Checking Your Appeal Status

To check the status of your appeal, go to the “Appeals” section of the Facebook Help Center. You can track the status of your appeal and see any updates.

5. Understanding Facebook’s Review Process

Facebook’s review process involves a thorough examination of your account, including the content you’ve posted, your interactions with other users, and any potential violations of the community standards. The following table summarizes the key factors considered during the review:

Factor Impact on Review
Severity of Violation More severe violations result in longer deactivations or bans.
Account History A history of repeated violations can lead to a permanent ban.
Supporting Evidence Providing clear evidence of mitigating circumstances can strengthen your appeal.
Community Impact Content that poses a significant risk to the Facebook community can result in a more severe penalty.

Preventing Future Hacks Through Enhanced Security

To prevent future hacks, it’s essential to enhance your security measures significantly. Here are some proactive steps you should consider:

1. Use Strong Passwords

Create complex passwords that are at least 12 characters long and include a mix of upper and lowercase letters, numbers, and symbols.

2. Enable Two-Factor Authentication (2FA)

Activate 2FA to add an extra layer of security. This requires you to provide a code sent to your phone in addition to your password when logging in.

3. Regularly Update Software

Keep your software, including your operating system and apps, up to date. Updates often patch security vulnerabilities that could be exploited by hackers.

4. Be Cautious of Suspicious Links

Avoid clicking on suspicious links in emails, messages, or social media posts. Hover over links to verify their destination before clicking.

5. Control App Permissions

Review the permissions you grant to apps. Only allow access to essential features and revoke permissions for apps you no longer use.

6. Use a Firewall and Anti-Malware Software

Implement a firewall to block unauthorized access to your network and install reputable anti-malware software to detect and remove malicious software from your devices.

Task Frequency
Change Password Every 3-6 months
Enable 2FA Immediately
Update Software As soon as updates are available
Review App Permissions Periodically (e.g., monthly)
Run Anti-Malware Scans Weekly

Deauthorizing Linked Apps and Third-Party Access

After regaining control of your Facebook account, it’s crucial to revoke access for any unauthorized or suspicious apps and third-party services. This will prevent them from accessing your personal data, posting on your behalf, or engaging in other malicious activities.

To deauthorize linked apps:

  1. Log in to your Facebook account.
  2. Click on the “Settings & Privacy” drop-down menu at the top right corner of the screen.
  3. Select “Settings”.
  4. Click on “Apps and Websites” in the left-hand menu.
  5. Review the list of linked apps and services.
  6. Click on the “Remove” button for any apps you want to deauthorize.
  7. Confirm your decision by clicking on the “Remove” button again.

Once you have deauthorized all unauthorized apps, it’s a good practice to regularly review your linked apps and revoke access for any services you no longer use or trust.

In addition to deauthorizing individual apps, you can also revoke access to all third-party apps and services with a single click. To do this:

Step 1: Log in to your Facebook account.
Step 2: Go to “Settings & Privacy” > “Settings”.
Step 3: Select “Apps and Websites” in the left-hand menu.
Step 4: Click on the “Disable Platform” button at the bottom of the page.
Step 5: Confirm your decision by clicking on the “Disable” button again.

By disabling the platform, you will revoke access for all third-party apps and services, including games, quizzes, and other integrations. Note that this action is permanent and cannot be undone.

Seeking Professional Assistance if Necessary

If you have exhausted all the self-recovery options and your Facebook account remains disabled, seeking professional assistance may be necessary. Here are a few recommended avenues:

Authorized Facebook Partners

Facebook has authorized certain companies to provide account recovery services on their behalf. These partners typically have a proven track record and expertise in resolving complex Facebook issues.

Third-Party Recovery Services

Several third-party companies specialize in Facebook account recovery. They employ skilled professionals who utilize advanced techniques to navigate difficult recovery scenarios.

Independent Tech Specialists

If you prefer a more personal approach, consider contacting an independent tech specialist or IT professional who has experience in handling Facebook account recovery issues.

Legal Options

In extreme cases where other methods fail, legal recourse may be a last resort. Consulting with a lawyer who specializes in internet law may provide guidance on options for recovering your Facebook account.

Service Type Advantages Disadvantages
Authorized Facebook Partners Official status, proven expertise May come with fees
Third-Party Recovery Services Specialized recovery techniques, 24/7 support Reliability can vary, may also incur fees
Independent Tech Specialists Personalized approach, flexible scheduling Expertise may vary, no official partnership with Facebook
Legal Options Potential legal leverage Time-consuming, expensive

Ultimately, the best course of action depends on your specific situation and budget. Consider your options carefully before proceeding to ensure the best chances of recovering your Facebook account.

Enhancing Your Online Security for Peace of Mind

Change Passwords Regularly

Avoid using the same password for multiple accounts and make sure they are complex enough to prevent easy guessing.

Enable Two-Factor Authentication

Add an extra layer of protection by requiring both a password and a code sent to your phone or email when logging in.

Review Privacy Settings

Adjust your Facebook privacy settings to limit who can see your posts and personal information. Consider making your profile private.

Use a Strong Antivirus

Install and maintain a reputable antivirus software on all your devices to protect against malware and cyber threats.

Be Cautious of Phishing Scams

Beware of emails or messages that appear to come from legitimate sources but attempt to steal your personal information.

Avoid Public Wi-Fi

Public Wi-Fi networks can be unsecure, making it easier for hackers to intercept data. Use caution when connecting to public Wi-Fi.

Educate Yourself

Stay informed about the latest online security threats and best practices. Take advantage of resources from reputable organizations.

Backup Your Data

Regularly back up your important data (photos, documents, etc.) in a secure location to prevent data loss in case of a hack.

Use a Virtual Private Network (VPN)

A VPN encrypts your internet traffic, providing an additional layer of security and privacy when browsing online.

Consider a Password Manager

Managing multiple complex passwords can be difficult. Consider using a password manager to securely store and manage your passwords.

Additional Tips

Tip Description
Disable Face Recognition Prevent Facebook from using your facial recognition data
Block Suspicious Apps Remove any third-party apps that you don’t recognize or use
Monitor Activity Log Regularly review your Facebook Activity Log to identify any suspicious activity

Facebook Was Hacked And Disabled How To Recover

If your Facebook account has been hacked and disabled, there are a few steps you can take to try to recover it. First, you should try to reset your password. If you can’t reset your password, you can try to contact Facebook’s support team. They may be able to help you recover your account.

Here are the steps you should take to recover your hacked and disabled Facebook account:

  1. Try to reset your password.
  2. Contact Facebook’s support team.

If you are unable to recover your account, you may need to create a new one.

People Also Ask

What should I do if my Facebook account has been hacked?

If your Facebook account has been hacked, you should try to reset your password. If you can’t reset your password, you can try to contact Facebook’s support team.

How can I contact Facebook’s support team?

You can contact Facebook’s support team by visiting their website or by emailing them.

What should I do if I can’t recover my hacked Facebook account?

If you are unable to recover your hacked Facebook account, you may need to create a new one.

Author sadminPosted on February 27, 2025Categories howtoTags account, disabled, facebook, hacked, login, password, recover, security

5 Easy Steps to Access Messenger

1 Easy Step to Login to Xbox Live on Xbox 360

1 Easy Step to Login to Xbox Live on Xbox 360

In the realm of digital communication, Messenger stands as a ubiquitous platform connecting billions worldwide. Whether you’re catching up with friends, sharing photos, or engaging in video calls, Messenger has become an indispensable tool for staying connected. However, accessing Messenger can sometimes pose challenges, especially for those who aren’t familiar with the platform. Fear not, for this comprehensive guide will unveil the secrets to unlocking Messenger and delving into its vast array of features.

First and foremost, you’ll need to create an account with Facebook. Messenger is an integral part of the Facebook ecosystem, so a Facebook account is a prerequisite for accessing it. If you don’t already have a Facebook account, you can easily create one by providing your name, email address, and choosing a password. Once your Facebook account is set up, you can proceed to download the Messenger app on your smartphone or tablet. The app is available for both Android and iOS devices, and can be found in the respective app stores.

After installing the Messenger app, you’ll need to sign in using your Facebook credentials. Once you’re logged in, you’ll be presented with a sleek and user-friendly interface. The main screen displays a list of your recent conversations, and you can easily initiate new conversations by searching for your contacts or typing in their phone numbers. Messenger offers a range of communication options, including text messaging, voice and video calls, and even the ability to send and receive payments. Additionally, the app integrates with various third-party services, allowing you to share content from other platforms such as Spotify or YouTube.

Crafting Your Messenger Profile

Identify Your Target Audience

Determine who you want to reach with your Messenger marketing efforts. Consider their demographics, interests, and online behavior. Understanding your target audience will help you tailor your profile and messaging to resonate with them.

Choose a Profile Picture and Username

Your profile picture should be a high-quality image that represents your brand or business. The username should be easy to remember and relevant to your purpose on Messenger. Consistency across all your social media channels is recommended for brand recognition.

Tips for Optimizing Your Profile Picture:

* Use a high-resolution, visually appealing image.
* Ensure your logo or brand element is prominent.
* Choose a format that is compatible with Messenger’s circular display.

Tips for Selecting a Username:

* Keep it short, memorable, and relevant.
* Consider using your business name or a variation of it.
* Avoid using special characters or numbers that may make it difficult to remember.

Connecting with Others on Messenger

Messenger is a fantastic platform for staying connected with friends, family, and colleagues. Here are some tips on how to get the most out of your Messenger experience:

Inviting Friends

To invite friends to Messenger, simply type their name or email address into the search bar at the top of the screen. If they already have a Facebook account, they will be invited to connect with you on Messenger. If they don’t have a Facebook account, they will be prompted to create one.

Starting a Conversation

To start a conversation with a friend on Messenger, simply click on their name in the list of contacts on the left side of the screen. You can then type your message into the text field at the bottom of the screen and press Enter to send it. You can also use emojis, GIFs, and stickers to add some fun to your conversations.

Creating Groups

If you want to chat with multiple friends at once, you can create a group chat. To do this, click on the “Create New Group” button on the left side of the screen and then add the friends you want to include. You can give the group a name and add a profile picture. You can also set privacy settings for the group to control who can join and who can see your messages.

Making Video Calls

In addition to sending text messages, you can also make video calls on Messenger. To do this, simply click on the video call icon in the top right corner of the screen when you are in a conversation with a friend. You can also use Messenger to make group video calls with up to 8 people.

Sharing Media

You can easily share photos, videos, and other media with your friends on Messenger. To do this, simply click on the paperclip icon in the bottom left corner of the screen when you are in a conversation with a friend. You can then select the file you want to share from your computer or your phone. You can also share your location, contacts, and other information with your friends on Messenger.

Feature How to Use
Inviting Friends Type their name or email address into the search bar
Starting a Conversation Click their name in the contact list and type your message
Creating Groups Click “Create New Group” and add friends
Making Video Calls Click the video call icon in the conversation
Sharing Media Click the paperclip icon and select the file

Customization and Personalization

Messenger offers a wide range of customization options to tailor your chat experience.

Chat Color and Emoji

You can personalize your chats by changing the background color and adding custom emojis. To do this, tap on a chat, then tap the “i” icon in the top right corner. Scroll down and select “Chat Settings” to choose your desired colors and emojis.

Notification Settings

Customize your notification settings to control how you receive alerts for messages. You can choose specific tones, vibration patterns, and even disable notifications for certain chats.

Theme Settings

Apply different themes to alter the overall look and feel of Messenger. From sleek and modern to vibrant and playful, there are various themes to choose from.

Chat Heads

Chat heads are customizable bubbles that float on your screen, allowing you to access chats without opening Messenger. You can change their size, color, and position for maximum convenience.

Nicknames and Custom Emojis

Assign nicknames to your contacts and create unique emojis to represent each person. This adds a personal touch to your conversations and helps you identify messages easily.

Game and App Integrations

Integrate games and apps with Messenger to enhance your chatting experience. Play games, share videos, and send GIFs without leaving the chat window.

Privacy and Security on Messenger

Messenger takes privacy and security seriously. The platform offers a range of features to protect users’ data and communication, including:

Message encryption

All messages sent through Messenger are end-to-end encrypted, meaning they can only be read by the sender and the recipient. This encryption ensures that even if Messenger’s servers are compromised, the messages will remain secure.

Privacy settings

Messenger offers customizable privacy settings that allow users to control who can message them, see their profile information, and share their location.

Blocking and reporting

Users can block or report other users who are being abusive or sending unwanted messages. Messenger will investigate reports and take appropriate action, including banning users who violate the platform’s policies.

2-Factor Authentication

Messenger supports 2-Factor Authentication (2FA), which adds an extra layer of security to user accounts. When 2FA is enabled, users are required to enter a code sent to their phone in addition to their password when logging into Messenger.

Security notifications

Messenger notifies users if suspicious activity is detected on their account, such as attempts to log in from an unknown location.

Data protection

Messenger complies with applicable data protection laws and regulations, including the General Data Protection Regulation (GDPR). The platform’s privacy policy outlines how Messenger collects, uses, and stores user data.

Reporting security issues

If users encounter any security issues on Messenger, they can report them through the platform’s Help Center or by contacting Messenger support directly.

Feature Customization
Chat Color Choose background colors
Emoji Add custom emojis
Notification Settings Specific tones, vibration, disable notifications
Theme Settings Sleek, modern, vibrant, playful themes
Chat Heads Size, color, position
Nicknames and Custom Emojis Unique nicknames and emojis
Game and App Integrations Games, videos, GIFs
Privacy Feature Description
Message encryption All messages are encrypted end-to-end, ensuring confidentiality.
Privacy settings Customizable settings to control message visibility, profile information, and location sharing.
Blocking and reporting Users can block and report abusive or unwanted senders for investigation and action.
2-Factor Authentication Adds an extra layer of security by requiring a code sent to the user’s phone for login.
Security notifications Messenger alerts users to suspicious account activity, such as unauthorized login attempts.
Data protection Messenger complies with data protection laws like GDPR, outlining data handling practices.
Reporting security issues Users can report security concerns through the Help Center or Messenger support channels.

Messenger Etiquette and Best Practices

To maintain professional and courteous communication on Messenger, it’s essential to adhere to the following etiquette guidelines:

Use Formal Language and Avoid Slang

When composing messages, opt for formal language and avoid using slang or casual terms. This conveys respect for the recipient and ensures clarity in communication.

proof Read Your Messages

Before sending messages, take a moment to proofread them for any errors in grammar, spelling, or punctuation. This attention to detail demonstrates professionalism and makes a positive impression.

Be Respectful of Others’ Time

Consider the recipient’s availability and time constraints. Avoid sending messages at inappropriate hours, such as late at night or early in the morning.

Use Appropriate Emojis Sparingly

Emojis can add a touch of personality to messages, but use them sparingly and appropriately. Excessive emoji usage can detract from the professionalism of communication.

Be Mindful of Tone

The tone of your messages conveys as much meaning as the words you choose. Avoid using accusatory or confrontational language, and instead strive to maintain a positive and respectful tone.

Avoid Sending Personal Messages During Work Hours

Unless it’s urgent, avoid sending personal messages during work hours. Respect your colleagues’ and clients’ work time by limiting personal conversations to outside of these hours.

Share Documents and Images Appropriately

When sharing documents or images, ensure they are relevant to the conversation and don’t contain any sensitive or confidential information.

Set Boundaries

Communicate your availability and response time expectations to others. This helps avoid misunderstandings and sets clear boundaries for professional communication.

Respond Promptly

While it’s not always possible to respond immediately, aim to respond to messages within a reasonable timeframe. This shows that you value the conversation and respect the other person’s time.

By following these best practices, you can maintain a professional and courteous demeanor on Messenger, fostering positive and productive communication.

The Messenger Platform: A Gateway to Conversational Commerce

Messenger is not just a messaging app; it’s a robust platform that businesses can leverage to engage with customers. With its wide range of features, including chatbots, payments, and customer support, Messenger allows businesses to create personalized experiences that drive sales and enhance the customer journey.

The Future of Messenger: Evolution and Innovation

1. AI-Powered Chatbots

Chatbots are becoming increasingly sophisticated, using advanced AI techniques to understand customer queries and provide tailored responses. This automation streamlines customer service and offers real-time support.

2. Personalized Recommendations

Messenger will continue to leverage user data to provide highly personalized product recommendations. By understanding customer preferences and purchase history, businesses can tailor their offerings and drive upsells.

3. Enhanced Payment Integrations

Messenger is integrating with multiple payment gateways, enabling seamless and secure transactions within the app. This convenience enhances the user experience and simplifies the checkout process.

4. Conversational Commerce

Messenger will facilitate end-to-end conversations between customers and businesses, from browsing products to purchasing and resolving support issues. This seamless integration streamlines the customer journey and boosts conversion rates.

5. Augmented Reality (AR) Experiences

AR will enhance product showcases and offer immersive experiences within Messenger. Customers will be able to interact with products virtually before making purchases, increasing trust and confidence.

6. Live Video Shopping

Messenger will continue to expand its live video shopping features, providing businesses with a powerful tool to connect with customers in real time. Interactive demonstrations and product Q&A sessions create a highly engaging shopping experience.

7. Subscription Management

Messenger will make it easier for customers to manage their subscriptions and recurring payments. With integrated dashboards, users can track their subscriptions, modify preferences, and cancel services conveniently.

8. Appointment Scheduling

Businesses can utilize Messenger to streamline appointment scheduling. Automated chatbots can confirm appointments, send reminders, and provide updates, improving customer convenience and reducing no-shows.

9. Customer Relationship Management (CRM) Integration

Messenger will continue to integrate with CRM systems, allowing businesses to track customer interactions, manage leads, and nurture relationships across channels.

10. Cross-Platform Compatibility

Messenger will expand its cross-platform compatibility, enabling users to access Messenger features seamlessly across multiple devices and platforms, enhancing user flexibility and convenience.

How To Get Into Messenger

Getting into Messenger is quick and easy. You can sign up for a new account or log in with your Facebook account.

To sign up for a new account:

  1. Go to the Messenger website or download the Messenger app.
  2. Click on "Create New Account."
  3. Enter your name, email address, and password.
  4. Click on "Sign Up."

To log in with your Facebook account:

  1. Go to the Messenger website or download the Messenger app.
  2. Click on "Log In with Facebook."
  3. Enter your Facebook email address and password.
  4. Click on "Log In."

People also ask about How To Get Into Messenger

What is the difference between Messenger and Facebook?

Messenger is a messaging app that allows you to send text, voice, and video messages to other Messenger users. Facebook is a social networking site that allows you to connect with friends and family, share photos and videos, and join groups.

Can I use Messenger without a Facebook account?

Yes, you can sign up for a new Messenger account without a Facebook account. However, you will need to provide your name, email address, and password.

How do I find people to message on Messenger?

You can find people to message on Messenger by searching for their name or email address. You can also add people to your contacts list by scanning their QR code.

How do I send a message on Messenger?

To send a message on Messenger, open the app and tap on the "Messages" tab. Then, tap on the "New Message" button and enter the name or email address of the person you want to message. Type your message and tap on the "Send" button.

Author sadminPosted on February 27, 2025Categories howtoTags access, chat, communication, facebook, login, messaging, messenger, social-media, step-by-step

4 Easy Steps to Reset Password in Cmd

1 Easy Step to Login to Xbox Live on Xbox 360

1 Easy Step to Login to Xbox Live on Xbox 360

In the digital realm, our passwords serve as the gatekeepers to our online accounts, protecting our sensitive information from unauthorized access. However, forgetfulness or compromised security can render our passwords ineffective, leaving us locked out of our virtual worlds. If you find yourself in such a predicament, fear not! This comprehensive guide will unveil the secrets of resetting your Windows password using the Command Prompt (CMD), a powerful tool that grants you access to the core functions of your operating system.

Unlike traditional methods that require a bootable USB drive or an administrator account, the CMD method offers a straightforward solution that can be executed from within the Windows Recovery Environment. By harnessing the capabilities of CMD, you can bypass forgotten passwords, regain control of your account, and restore access to your precious data. This guide will provide step-by-step instructions, ensuring that you can navigate the CMD interface with confidence and recover your password with ease. Embark on this journey to unlock your digital realms once more.

Reset Password In Cmd

Before venturing into the realm of CMD, it’s crucial to note that this method is intended for users with administrative privileges on their Windows machines. If you do not possess administrator rights, alternative password recovery methods may be necessary. With this caveat in mind, let’s delve into the intricacies of resetting your password using CMD. Follow the ensuing steps meticulously, and you’ll soon be back in command of your digital fortress.

How to Reset Password in Cmd

If you have forgotten your Windows password, you can reset it using the Command Prompt (Cmd). Here are the steps:

  1. Boot your computer into Safe Mode.
  2. Click on the “Command Prompt” option in the Safe Mode menu.
  3. Type the following command into the Command Prompt window:
    “`
    net user username newpassword
    “`

    Replace “username” with your actual username and “newpassword” with your new password.

  4. Press Enter.
  5. Restart your computer and log in using your new password.
  6. People Also Ask

    How Do I Reset Administrator Password in Cmd?

    To reset an administrator password in Cmd, follow the steps above but use “Administrator” as the username. Make sure to use a strong password that you can remember.

    How Do I Reset Windows Password Without Knowing Password Cmd?

    Unfortunately, it is not possible to reset a Windows password without knowing the current password using only the Command Prompt. You may need to use a password recovery tool or reinstall Windows.

    How Do I Reset Bios Password in Cmd?

    Resetting a BIOS password using the Command Prompt is not possible. You will need to use a hardware method to reset the BIOS, such as removing the CMOS battery or using a jumper switch on the motherboard.

Author sadminPosted on January 8, 2025Categories howtoTags access, cmd, computer, forgotten-password, login, password-recovery, reset-password, security, windows, windows-command-prompt

Recent Posts

  • 6 Easy Steps to Mastering Table Pool
  • 10 Best Friendship Dynamics in English Literature
  • 4 Best Jeans For Small Waist Large Hips
  • 5 Ways to Use a Makeup Highlighter Stick
  • 5 Steps to Install Fence Lattice

Recent Comments

  1. A WordPress Commenter on Hello world!
flexco.com Proudly powered by WordPress