5 Ways To Get Rare Candy In Pokemon Go

5 Ways To Get Rare Candy In Pokemon Go

Every Pokemon Go player wants to get their hands on Rare Candy. This special item can be used to power up any Pokemon, making it an incredibly valuable resource. However, Rare Candy is also one of the rarest items in the game, making it difficult to obtain. Here are a few tips on how to get Rare Candy in Pokemon Go.

$title$

One of the best ways to get Rare Candy is to participate in Raid Battles. Raid Battles are special events that allow players to team up and battle powerful Pokemon. If you defeat the Raid Boss, you will be rewarded with a variety of items, including Rare Candy. The higher the level of the Raid Boss, the more Rare Candy you will receive. Additionally, you can also get Rare Candy by completing Research Tasks. Research Tasks are special challenges that you can complete to earn rewards. Some Research Tasks will reward you with Rare Candy, so be sure to keep an eye out for them. Finally, you can also get Rare Candy by hatching Eggs. Eggs can be obtained by spinning PokéStops and Gyms. When you hatch an Egg, you have a chance of getting Rare Candy. The type of Rare Candy you get will depend on the type of Pokemon that hatches.

Rare Candy is a valuable resource that can help you power up your Pokemon and make them more powerful in battle. By following these tips, you can increase your chances of getting Rare Candy and improving your Pokemon Go experience. In addition to the methods listed above, there are also a few other ways to get Rare Candy in Pokemon Go. One way is to purchase it from the in-game shop. However, this is not recommended as Rare Candy is very expensive. Another way to get Rare Candy is to trade with other players. However, this can be difficult to do as most players are reluctant to trade away their Rare Candy.

How to Get Rare Candy in Pokemon Go

Rare Candy is a valuable item in Pokemon Go that can be used to power up any Pokemon. It is a great way to quickly increase the CP of your Pokemon, which can be helpful for taking on Gym Leaders and other challenging opponents.

There are several ways to get Rare Candy in Pokemon Go. One way is to defeat Raid Bosses. Raid Bosses are powerful Pokemon that appear at Gyms for a limited time. Defeating a Raid Boss will reward you with a variety of items, including Rare Candy.

Another way to get Rare Candy is to participate in Research Tasks. Research Tasks are short quests that can be completed by interacting with PokeStops. Completing a Research Task will reward you with a variety of items, including Rare Candy.

Finally, you can also get Rare Candy by trading Pokemon with other players. When you trade a Pokemon, you will have a chance to receive Rare Candy as a bonus.

People Also Ask

How many Rare Candies does it take to power up a Pokemon?

The amount of Rare Candy required to power up a Pokemon varies depending on the Pokemon’s level. However, in general, it takes about 20 Rare Candy to power up a Pokemon from level 20 to level 21.

What is the best way to get Rare Candy?

The best way to get Rare Candy is to defeat Raid Bosses. Raid Bosses are powerful Pokemon that appear at Gyms for a limited time. Defeating a Raid Boss will reward you with a variety of items, including Rare Candy.

Can you get Rare Candy from eggs?

No, you cannot get Rare Candy from eggs.

Top 10 Companion Perks in Fallout 4

Top 10 Companion Perks in Fallout 4

In the desolate wasteland of Fallout 4, where every step is a perilous journey, the unwavering companionship of a loyal companion can be a lifeline. Amidst the treacherous ruins and formidable foes, these enigmatic individuals offer an unyielding bond and invaluable support that can make all the difference in the relentless struggle for survival. From the enigmatic Dogmeat to the enigmatic Nick Valentine, each companion possesses their unique personality, abilities, and motivations, promising an unparalleled gaming experience that will forever etch their names into the annals of gaming history.

Among the eclectic cast of companions, Dogmeat stands out as a quintessential icon. This faithful canine companion, with his unwavering loyalty and endearing antics, has captured the hearts of players worldwide. His keen senses prove invaluable in unearthing hidden items and tracking elusive enemies, making him an indispensable asset in the face of danger. His unconditional love and unwavering presence provide a comforting solace amidst the unforgiving wasteland, offering a beacon of hope in the darkest of times.

Another notable companion is Nick Valentine, the enigmatic synth detective. His sharp intellect, wry humor, and unwavering determination make him a formidable ally in the labyrinthine world of Diamond City. His expertise in solving mysteries and negotiating complex situations proves invaluable, unraveling the tangled webs of deceit and corruption that plague the wasteland. With his trench coat and fedora, Nick embodies the classic noir detective archetype, bringing a touch of intrigue and sophistication to the post-apocalyptic setting.

Best Companion in Fallout 4

Fallout 4 is an expansive RPG with a wide cast of companions, each with their own unique abilities and personalities. Choosing the best companion can be a difficult decision, but there are a few factors to consider that can help you make the best choice for your playstyle.

First, consider your character’s build. If you’re playing a stealthy character, you’ll want a companion who can help you sneak around undetected. If you’re playing a melee character, you’ll want a companion who can tank damage and deal out punishment. And if you’re playing a ranged character, you’ll want a companion who can provide cover fire and support.

Another important factor to consider is your companion’s personality. Some companions are more serious and focused, while others are more lighthearted and playful. Choose a companion that you enjoy spending time with and who you feel complements your own personality.

People Also Ask

Who is the strongest companion in Fallout 4?

Strong.

Strong is a super mutant companion who is incredibly strong and durable. He can deal out a lot of damage in melee combat and can also be used as a pack mule to carry your excess gear.

Who is the best companion for a stealth build?

Piper.

Piper is a journalist who is skilled in stealth and lockpicking. She can help you sneak around undetected and can also provide you with valuable information about the Commonwealth.

Who is the best companion for a melee build?

Dogmeat.

Dogmeat is a loyal companion who is always by your side. He may not be the strongest or most skilled companion, but he makes up for it with his unwavering loyalty and his ability to sniff out enemies.

9 Best Shoes for Working on Your Feet All Day

5 Ways To Get Rare Candy In Pokemon Go

Stepping onto the professional stage, whether it’s navigating bustling hospital corridors or manning the frontlines of bustling retail stores, demands reliable footwear that empowers you to perform optimally throughout the day. Extended hours spent on your feet require shoes engineered to provide unwavering support, exceptional comfort, and enduring durability. Discover the pinnacle of footwear designed to alleviate fatigue, prevent discomfort, and enhance your productivity while traversing the challenges of your workday.

When selecting the ideal shoes for extended periods of standing, prioritize comfort above all else. Opt for shoes crafted from breathable materials that allow your feet to remain cool and dry, preventing the buildup of moisture and subsequent discomfort. Adequate cushioning is paramount, acting as a shock absorber to mitigate the impact forces transferred through your feet with each step. Ensure the shoes provide ample arch support, preventing excessive pronation or supination that can lead to foot pain and strain. Moreover, consider shoes with a roomy toe box, granting your toes ample space to move freely without constriction.

Durability is another crucial factor to consider. Shoes subjected to prolonged standing must withstand the rigors of constant wear and tear. Seek shoes constructed from high-quality materials, such as genuine leather or synthetic materials known for their resilience. Reinforcements in high-stress areas, like the heel and toe, enhance longevity and prevent premature wear. Additionally, opt for shoes with slip-resistant soles to ensure stability on various surfaces, minimizing the risk of slips and falls. By investing in durable footwear, you not only safeguard your feet but also ensure a worthwhile investment that will accompany you through countless hours of standing.

$title$

Finding the Right Fit for Your Feet

Finding the right fit for your feet is essential for long days on your feet. Consider the following factors:

Foot Length: Measure your feet at the end of the day when they’re slightly swollen. Use a measuring tape from the tip of your longest toe to the back of your heel.

Foot Width: Stand on a piece of paper and trace the outline of your feet. Measure the widest part of the outline for your foot width.

Arch Type: Determine your arch type by examining your footprints or pressing your hand against your foot. If you leave a high arc, you have high arches. If your footprint is almost flat, you have low arches. If your footprint is slightly curved, you have medium arches.

Arch Type Width
High Narrow to Medium
Medium Medium
Low Wide to Extra Wide

Instep Height: The instep is the top of your foot, from the arch to the ankle. Measure the distance from the sole of your foot to the top of your instep.

Heel-to-Toe Drop: This measurement determines the angle of your foot in the shoe. A higher drop means your heel is elevated more than your toes, while a lower drop means your foot is closer to flat. Consider your activity level and foot position when choosing a drop.

Common Mistakes to Avoid When Shopping for Work Shoes

Buying Shoes That Are Too Small or Too Big

Ensure your work shoes fit snugly but not too tightly. Too-small shoes can cause blisters and discomfort, while too-big shoes can be tiring and increase the risk of tripping or twisting your ankle.

Ignoring the Heel Height

Choosing the right heel height is crucial. Avoid shoes with excessively high or low heels. High heels can strain your feet and back, while low heels may not provide enough support. A heel height of 1-2 inches is generally recommended for optimal comfort.

Not Considering the Type of Activity

The type of work you do should influence your shoe choice. If your job involves extensive standing or walking, look for shoes with good arch support and cushioning. For jobs that require bending or squatting, opt for shoes with flexible soles.

Neglecting the Material

Choose shoes made of breathable and durable materials. Leather and mesh are excellent options, providing comfort and breathability. Avoid shoes made of synthetic materials that can cause sweating and discomfort.

Assuming All Work Shoes Are Non-Slip

Not all work shoes are non-slip. Look for shoes with a slip-resistant sole to prevent accidents on slippery surfaces. Check the sole for distinct treads or patterns that indicate non-slip properties.

Forgetting to Break In Your Shoes

New work shoes can take some time to adjust to your feet. Wear them for short periods initially and gradually increase the time until you can comfortably wear them for an entire workday.

The Best Shoes for Working on Your Feet All Day

If you’re on your feet all day, it’s important to have a pair of shoes that provide comfort and support. The right shoes can help you avoid foot pain, fatigue, and injuries. Here are some of the best shoes for working on your feet all day:

Athletic shoes: Athletic shoes are designed to provide support and cushioning, making them a good choice for people who work on their feet all day. Look for shoes with a supportive arch, good cushioning, and a breathable upper.
Nursing shoes: Nursing shoes are designed to be comfortable and supportive for nurses and other healthcare professionals who work long hours on their feet. They typically have a low heel, a supportive arch, and a non-slip sole.
Walking shoes: Walking shoes are designed for comfort and support over long distances. They typically have a cushioned sole, a supportive arch, and a breathable upper.

People Also Ask

What are the most important features to look for in shoes for working on your feet all day?

Support, cushioning, and breathability are the most important features to look for in shoes for working on your feet all day.

What are some good brands of shoes for working on your feet all day?

Some good brands of shoes for working on your feet all day include: New Balance, Brooks, ASICS, and Saucony.

How often should I replace my work shoes?

It is important to replace your work shoes every 6-8 months, or more often if they show signs of wear and tear.

5 Easy Steps to Clean On Cloud Shoes

On Cloud Shoes
How To Clean On Cloud Shoes

When it comes to cleaning On Cloud shoes, it is important to use the right methods and materials to ensure that you do not damage the shoes. On Cloud shoes are made with a variety of materials, including mesh, synthetic leather, and rubber. Each of these materials requires a different cleaning method.

To clean the mesh upper, you can use a soft brush or a damp cloth. If the mesh is heavily soiled, you can use a mild detergent. Be sure to rinse the shoes thoroughly after cleaning. To clean the synthetic leather, you can use a damp cloth and a mild detergent. Be sure to avoid using harsh chemicals or abrasive cleaners, as these can damage the leather. To clean the rubber outsole, you can use a stiff brush and a mild detergent. Be sure to rinse the shoes thoroughly after cleaning.

Once you have cleaned the shoes, you can dry them by air drying or using a shoe dryer. If you are using a shoe dryer, be sure to use the lowest heat setting to avoid damaging the shoes. Once the shoes are dry, you can apply a water-resistant spray to help protect them from future stains.

The Essential Guide to Pristine Cloud Shoes

Materials You’ll Need

Before embarking on the cleaning process, gather the following essential materials:

  • Soft-bristled toothbrush
  • Mild dishwashing soap
  • Lukewarm water
  • Microfiber cloth
  • Dry towel
  • Cotton swabs (optional)
  • Shoe protecting spray (optional)

Detailed Cleaning Instructions

1. Remove Laces and Insoles: Begin by removing the shoe laces and insoles. This will allow you to thoroughly clean the entire shoe.

2. Brush Away Loose Dirt: Using a soft-bristled toothbrush, gently brush away loose dirt and debris from the surface of the shoes.

3. Create a Cleaning Solution: In a bowl, mix a small amount of mild dishwashing soap with lukewarm water. Dip the toothbrush into the solution and gently agitate the surface of the shoes to create a lather.

4. Scrub Specific Areas: Focus on cleaning the areas most prone to dirt, such as the toe box, heel, and sides. Use circular motions to remove stubborn stains.

5. Use Cotton Swabs for Crevices: For intricate areas like the treads or laces eyelets, use cotton swabs dipped in the cleaning solution to remove dirt and grime.

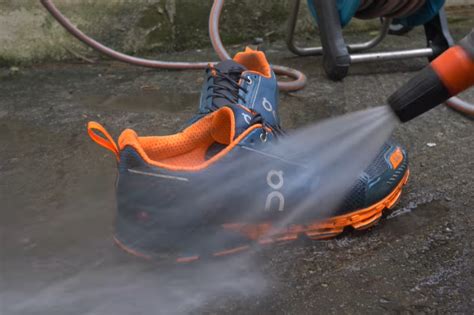
6. Rinse Thoroughly: Rinse the shoes under lukewarm running water to remove any soap residue. Avoid using high-pressure water streams, as this could damage the material.

7. Blot Excess Water: Use a microfiber cloth to gently blot away excess water from the shoes. Avoid wringing or twisting the shoes, as this could stretch or damage the fabric.

8. Air Dry: Place the shoes in a well-ventilated area to air dry completely. Do not expose the shoes to direct sunlight or high heat, as this could fade the color.

9. Apply Shoe Protection (Optional): Once the shoes are completely dry, you can apply a protective spray to help repel dirt and water. This step is optional but recommended for maintaining the longevity of your shoes.

Removing Stubborn Marks for Spotless Cloud Shoes

1. Hand-washing with Mild Detergent

For everyday cleaning, gently spot-clean affected areas with a soft-bristled brush dipped in warm water mixed with a mild detergent. Blot away excess moisture with a clean cloth.

2. Machine-washing on Delicate Cycle

For deeper cleaning, place the shoes in a mesh laundry bag and select a delicate cycle with cold water. Use a mild detergent and avoid using bleach or harsh chemicals.

3. Utilizing a Magic Eraser

For stubborn stains, dampen a Magic Eraser and gently rub it over the affected area in circular motions. Rinse the area thoroughly with water and blot dry.

4. Advanced Cleaning Techniques with Baking Soda Paste

For particularly persistent marks, create a paste by mixing baking soda with a small amount of water. Apply the paste to the stains and allow it to sit for 30 minutes to an hour. Gently scrub the paste away with a soft-bristled brush, and then rinse the area thoroughly with water.

If necessary, repeat the process with a fresh baking soda paste. For more intense stains, you can also try using a commercial stain remover specifically designed for use on sneakers.

Baking Soda Cleaning Steps
Create baking soda paste
Apply to stains and let sit
Scrub with soft-bristled brush
Rinse with water

Preserving the Cloud-Like Cushion: A Delicate Balancing Act

The unique CloudTec cushioning system in On shoes is a delicate balance of materials and design. While it provides unparalleled comfort and support, it also requires special care to maintain its performance. Here’s a comprehensive guide to cleaning On Cloud shoes without compromising their cushioning integrity:

Cleaning the Upper

The upper of On shoes is typically made of breathable mesh or canvas. Use a soft brush or cloth dampened with lukewarm water to gently wipe away dirt and grime. Avoid using abrasive cleaners or bleach, as these can damage the delicate fibers.

Cleaning the Midsole

The midsole of On shoes contains the CloudTec cushioning system. It’s made of a lightweight and responsive foam that requires gentle handling. Wipe it down with a damp cloth and avoid direct exposure to heat or strong detergents.

Cleaning the Outsole

The outsole of On shoes provides traction and durability. Remove excess dirt with a brush and then rinse it thoroughly with water. Avoid using harsh cleansers or solvents, as they can compromise the grip and longevity of the sole.

Additional Cleaning Tips

  1. Hand-wash On shoes with lukewarm water and a mild detergent.
  2. Do not put On shoes in the washing machine or dryer.
  3. Gently squeeze out excess water using a towel, but avoid wringing or twisting.
  4. Air-dry On shoes completely before wearing them again.
  5. Use a shoe brush to remove stubborn dirt after runs or workouts.
  6. Avoid exposing On shoes to harsh chemicals or extreme temperatures.

Recommended Cleaning Intervals

Cleaning Frequency Cleaning Method
After every run or workout Wipe down with a damp cloth
Once a week Hand-wash with a mild detergent
As needed Remove stubborn dirt with a shoe brush

Embracing Preventive Measures for Pristine Cloud Footwear

Preserving the pristine condition of your Cloud footwear begins with proactive measures. Implement these strategies to minimize the accumulation of dirt and stains:

1. Brush Away Everyday Debris

Regularly use a soft-bristled brush to gently remove loose dirt, dust, or mud from the surface of your shoes.

2. Use a Water-Resistant Spray

Before wearing your shoes for the first time, apply a water-resistant spray to create a protective barrier against moisture and stains.

3. Protect Against Rain and Snow

If possible, avoid wearing your Cloud shoes in inclement weather to prevent water damage and salt stains.

4. Store in a Dry, Well-Ventilated Area

When not in use, store your shoes in a cool, dry place with good air circulation to prevent mold and odor.

5. Use Stain-Repellent Sprays

If you anticipate exposure to potentially staining substances, consider using a stain-repellent spray to minimize the impact on your shoes.

6. Address Small Stains Promptly

If you notice small stains on your shoes, immediately use a damp cloth to wipe them away. Avoid using harsh chemicals or detergents.

7. Proper Care for Different Materials

The care requirements for Cloud shoes vary depending on the materials used in their construction. Refer to the table below for specific cleaning instructions:

Material Cleaning Instructions
Knit Fabric Gently spot clean with a damp cloth. Use a mild detergent if necessary.
Synthetic Leather Wipe clean with a damp cloth and a small amount of dish soap.
Mesh Use a soft brush or cloth to remove dirt and dust. Handwash with mild detergent if needed.

Addressing Common Cloud Shoe Cleaning Challenges

Cloud shoes, with their soft, lightweight materials, offer unparalleled comfort and breathability. However, keeping them pristine can be a challenge, especially when faced with common cleaning obstacles.

1. Excessive Dirt and Debris

When your Cloud shoes encounter dirt, dust, and grime, the first step is to remove loose particles with a soft-bristled brush. Use gentle strokes to avoid damaging the delicate fabric.

2. Stubborn Stains

Treating stubborn stains requires a specific approach. If possible, blot the stain immediately with a clean, damp cloth to prevent it from setting. Avoid using harsh detergents or bleach, as they can discolor the fabric.

3. Odor Control

Persistent odors can be tackled by disinfecting the shoes with a solution of baking soda and water. Sprinkle baking soda inside the shoes, leave it overnight, and vacuum it out in the morning.

4. Yellowing of White Shoes

With time, white Cloud shoes may develop a yellowish tinge. To brighten them, create a paste of baking soda and water and apply it to the affected areas. Leave it on for several hours before rinsing it off.

5. Restoring Freshness

To restore the freshness of your Cloud shoes, fill them with crumpled newspaper and leave them in a well-ventilated area overnight. The newspaper will absorb moisture and deodorize the shoes.

6. Preventing Airflow Blockage

The breathable mesh fabric of Cloud shoes can become clogged with dirt and debris over time. Regularly brush the exteriors and use a vacuum cleaner with a soft brush attachment to remove any accumulated particles.

7. Cleaning the Laces

Remove the laces from the shoes and soak them in a solution of warm water and mild detergent. Use a soft-bristled brush to gently scrub the laces, then rinse and air-dry them.

8. Deep Cleaning for Refreshing Your Cloud Shoes

For a thorough deep clean, follow these steps:

Step Instructions
1. Remove laces Untie the laces and remove them from the shoes.
2. Brush away loose dirt Use a soft-bristled brush to sweep away any loose dirt or debris from the shoes’ surface.
3. Prepare cleaning solution Mix a gentle detergent or cleaning solution with warm water in a bowl.
4. Apply and scrub Dip a clean sponge or cloth into the cleaning solution and gently scrub the shoes’ exteriors, avoiding the soles.
5. Rinse thoroughly Rinse the shoes thoroughly with clean water to remove all traces of the cleaning solution.
6. Air-dry Allow the shoes to air-dry completely in a well-ventilated area.

Choosing the Right Cleaning Arsenal for Cloud Shoe Care

1. Soft-Bristled Brush

A soft-bristled brush, such as a toothbrush or shoe brush, is ideal for gently removing dirt and debris from Cloud shoes without damaging the delicate material.

2. Clean Cloths or Sponge

Microfiber cloths or a soft sponge will help absorb and remove dirt and cleaning solutions from the shoes.

3. Mild Soap or Detergent

Use a gentle soap, such as a dishwashing liquid or laundry detergent, to remove stubborn stains. Avoid harsh chemicals or bleach.

4. Shoe Cleaner

Specifically designed shoe cleaners can effectively remove dirt and stains without damaging the shoe’s material.

5. Baking Soda

Baking soda helps neutralize odors and absorb excess moisture.

6. Hydrogen Peroxide

Hydrogen peroxide (3% solution) can be used to spot-clean white Cloud shoes to remove yellowing or stains.

7. White Vinegar

White vinegar can be diluted with water to create a solution that helps remove dirt and stains.

8. Isopropyl Alcohol

Isopropyl alcohol can be used to dissolve stubborn stains and disinfect the shoes.

9. Specialized Cloud Shoe Cleaner

For optimal results and specialized care, consider using a cleaner specifically designed for Cloud shoes. These products often contain formulations tailored to the unique materials and construction of Cloud shoes.

Cleaning Agent Benefits
Soft-Bristled Brush Gentle removal of dirt and debris
Microfiber Cloth Absorption and removal of dirt and cleaning solutions
Mild Soap Effective stain removal without damage
Baking Soda Odor neutralization and moisture absorption
Hydrogen Peroxide Spot-cleaning for white shoes to remove discoloration

The Ultimate Cloud Shoe Cleaning FAQ: Unveiling Expert Insights

1. What’s the best method to clean Cloud shoes?

Start by removing loose dirt and debris with a soft-bristled brush. Then, mix a solution of mild dish soap and water. Gently scrub the shoes with the solution using a clean cloth or sponge, avoiding the use of harsh chemicals or detergents that could damage the material.

2. Can I machine-wash Cloud shoes?

No, machine washing is generally not recommended for Cloud shoes. The tumbling motion and detergents used in washing machines can cause damage to the delicate materials.

3. How do I clean the insoles?

Remove the insoles and soak them in a dish soap and water solution for at least 30 minutes. Gently scrub with a soft-bristled brush and rinse thoroughly. Allow to air dry completely before reinserting into the shoes.

4. Can I use bleach on Cloud shoes?

No, bleach can damage the materials of Cloud shoes. Stick to mild detergents and avoid any products containing bleach.

5. How do I prevent staining?

Protect your Cloud shoes from spills by using a water-repellent spray. Regularly cleaning and drying your shoes can also help prevent stains from setting in.

6. Can I use a dryer to dry my Cloud shoes?

Do not machine dry your Cloud shoes. Heat can damage the materials and cause them to shrink or deform. Allow your shoes to air dry naturally at room temperature.

7. How often should I clean my Cloud shoes?

Regular cleaning is crucial for maintaining the appearance and longevity of your Cloud shoes. Clean your shoes after every wear, especially if they have been exposed to dirt, salt, or moisture.

8. Can I clean Cloud shoes with a steam cleaner?

Steam cleaning is not recommended for Cloud shoes. The heat and moisture can damage the materials.

10. Troubleshooting Common Cloud Shoe Cleaning Issues

Problem: Stains won’t come out
Solution: Try using a stain remover specifically designed for the material of your Cloud shoes. Allow the stain remover to sit on the stain for several minutes before gently scrubbing with a soft-bristled brush.

Problem: Shoes have a bad odor
Solution: Sprinkle baking soda inside your Cloud shoes and leave it overnight. The baking soda will absorb moisture and neutralize odors. Remove the baking soda before wearing your shoes.

How to Clean On Cloud Shoes

On Cloud shoes are known for their comfort and style, but they can get dirty over time. Here are a few tips on how to clean On Cloud shoes:

  1. Remove loose dirt. Use a soft brush to remove any loose dirt or debris from the shoes.
  2. Wipe down the shoes with a damp cloth. Use a damp cloth with mild soap to wipe down the shoes. Be sure to rinse the cloth thoroughly after each wipe.
  3. Use a shoe cleaner. If the shoes are particularly dirty, you can use a shoe cleaner specifically designed for On Cloud shoes.
  4. Air dry the shoes. Allow the shoes to air dry completely before wearing them again.

People Also Ask About How to Clean On Cloud Shoes

How often should I clean my On Cloud shoes?

It depends on how often you wear them and how dirty they get. If you wear them regularly, you should clean them at least once a month. If they get particularly dirty, you can clean them more often.

Can I put my On Cloud shoes in the washing machine?

No, you should not put On Cloud shoes in the washing machine. The washing machine can damage the shoes and the cushioning.

What is the best way to clean the laces of my On Cloud shoes?

You can clean the laces of your On Cloud shoes by hand with mild soap and water. You can also put the laces in a mesh bag and wash them in the washing machine on a gentle cycle.

4 Steps to Make Your Likes Public on Twitter

5 Ways To Get Rare Candy In Pokemon Go
Make Your Likes Public On Twitter

Do you want to know how to make your likes public on Twitter? If so, you are not alone! Many people want to share their interests with others, and making your likes public is a great way to do that.

In this article, we are going to show you how to make your likes public on Twitter. We will also provide some tips on how to use this feature to your advantage.

First, you need to log in to your Twitter account. Once you are logged in, click on the “Settings” tab. Then, click on the “Privacy and safety” tab. Under the “Your Tweets” section, you will see an option that says “Protect my Tweets.” Uncheck this box if you want to make your likes public.

Once you have unchecked this box, your likes will be visible to everyone. This means that anyone who visits your profile will be able to see what you have liked.

Making your likes public can be a great way to connect with other people who share your interests. It can also help you to discover new content that you might not have otherwise seen. If you are looking for a way to share your interests with others, making your likes public is a great option.

However, it is important to keep in mind that making your likes public also means that everyone will be able to see what you have liked. If you are not comfortable with this, you may want to reconsider making your likes public.

Enabling Public Likes on a Desktop Browser

1. **Log in to your Twitter account.** Open your web browser and navigate to Twitter’s homepage. Enter your username and password to log in.

2. **Click on your profile picture.** This is located in the top-right corner of the screen, next to the “Home” button.

3. **Select “Settings and privacy” from the dropdown menu.** This will open a new page with various account settings.

4. **Click on the “Privacy and safety” tab.** This is located in the left-hand menu.

5. **Scroll down to the “Privacy” section.** This section is located near the bottom of the page.

6. **Under the “Likes” heading, select the “Yes” or “No” radio button.** The “Yes” option makes your likes public, while the “No” option makes them private.

7. **Click on the “Save changes” button.** This will save your changes and make your likes public or private, depending on your selection.

8. **Refresh your Twitter page.** This will update your profile and make your likes visible to others, if you chose to make them public.

Please note that it may take some time for your likes to become visible to others. Also, keep in mind that this setting only applies to likes made after you enable public likes. Your previous likes will not be made public unless you manually change their privacy settings.

Making Likes Public on a Mobile Device

To make your likes public on Twitter using a mobile device, follow these steps:

  1. Open the Twitter app on your phone or tablet.
  2. Tap your profile picture in the top-left corner to open your profile page.
  3. Click the menu icon (three dots) in the top-right corner and then click the “Settings and privacy” option.
  4. Click the “Privacy and safety” tab.
  5. Under the “Privacy” section, scroll down to the “Likes” option and toggle the “Public” button to the right.

Your likes will now be publicly visible to everyone on Twitter, even if they don’t follow you. If you later change your mind and want to make your likes private again, simply follow the same steps and toggle the “Public” button back to the left.

Here is a table summarizing the steps for making your likes public on Twitter using a mobile device:

Step Action
1 Open the Twitter app and tap your profile picture.
2 Tap the menu icon, tap “Settings and privacy,” and then tap the “Privacy and safety” tab.
3 Under the “Privacy” section, scroll down to the “Likes” option and toggle the “Public” button to the right.

Managing Your Privacy Settings

Your Twitter privacy settings allow you to control who can see your tweets, likes, and other account information. You can manage these settings from the “Privacy and safety” section of your account.

Once you’re in the “Privacy and safety” section, you can manage your privacy settings by clicking on the “Edit” button next to each setting.

Here is a more detailed breakdown of the different privacy settings you can manage:

Who can see my tweets?

This setting controls who can see your tweets. You can choose between three options:

Option Who can see your tweets
Public Anyone can see your tweets
Followers Only people who follow you can see your tweets
Protected Only people you approve can see your tweets

Accessing Your Liked Tweets

To view your liked tweets, follow these steps:

  1. Log in to your Twitter account.
  2. Click on your profile icon in the top-right corner of the screen.
  3. Select “Profile” from the drop-down menu.
  4. Click on the “Liked Tweets” tab below your profile picture.

Your liked tweets will be displayed in a chronological order, with the most recent tweet at the top. You can scroll through the list or use the search bar at the top of the page to find a specific tweet.

You can also download an archive of your liked tweets in a CSV or JSON file. To do this, click on the “Settings and privacy” link in the bottom-left corner of the screen, then select “Your Twitter data” under the “Account” section.

On the “Your Twitter data” page, scroll down to the “Liked tweets” section and click on the “Request data” button. Twitter will send you an email when the archive is ready to download.

Exploring Tweets You’ve Liked

View your liked tweets by following these steps:

  1. Log in to your Twitter account.
  2. Click on your profile picture in the top-right corner.
  3. Select “Profile” from the drop-down menu.
  4. Scroll down to the “Likes” section.
  5. Click on the “See all” button to view all of your liked tweets.

Table: Navigating Liked Tweets

Action Steps
View all liked tweets Click on the “See all” button in the “Likes” section of your profile.
Filter liked tweets Use the “Filter” button to sort tweets by date, type, or media.
Unlike a tweet Click on the “Unlike” button beneath the tweet.
Share a liked tweet Click on the “Share” button beneath the tweet.
Bookmark a liked tweet Click on the “Bookmark” button beneath the tweet.
Mute a liked tweet’s author Click on the “Mute” button beneath the tweet.

Interacting with Liked Tweets

Once you’ve liked a tweet, you have several options for engaging with it:

Replies

Click on the “Reply” button to add your own thoughts or comments to the conversation. Your reply will be visible to anyone who views the original tweet.

Retweets

Click on the “Retweet” button to share the tweet with your followers. You can choose to retweet the tweet as-is or add your own commentary before sharing it.

Sharing via Direct Message

Click on the “Share via Direct Message” button to send the tweet to a specific user or group of users. This allows you to share the tweet with individuals you think would find it interesting or relevant.

Saving to Lists

Click on the “Add to List” button to add the tweet to a specific list you’ve created. This helps you organize and categorize tweets that you find valuable or interesting.

Liking and Unliking Tweets

Click on the “Like” button again to remove your like from a tweet. You can also hover over the heart icon to see the number of likes the tweet has received.

Notifications for Liked Tweets

By default, you will not receive notifications when someone interacts with a tweet you’ve liked. However, you can enable notifications for specific users or tweets by clicking on the bell icon located near the top of the tweet. This allows you to stay informed about updates and conversations related to the tweets you’ve liked.

Benefits of Public Likes

Making your likes public on Twitter offers several advantages:

  1. **Discover New Content:** When your likes are public, other users can see what content you’re engaging with, which can help them discover new accounts, articles, and tweets that align with their interests.
  2. **Build Community:** Public likes foster a sense of community by creating opportunities for users to connect with others who share similar interests.
  3. **Signal of Approval:** By liking something publicly, you are essentially signaling to others that you approve of the content and find it valuable.
  4. **Increase Exposure:** When you like a tweet, it will appear in the “Likes” section of your profile. This provides an opportunity for your likes to gain additional visibility and reach a wider audience.
  5. **Encourage Reciprocity:** Making your likes public can encourage others to like your content in return, leading to increased engagement and visibility.
  6. **Personalize Your Timeline:** Public likes help personalize your Twitter timeline by showcasing the content you find most interesting and relevant.
  7. **Data Insights:** Twitter collects data on public likes, which can provide valuable insights into user interests, trends, and social dynamics.
  8. **Transparency and Accountability:** Public likes promote transparency and accountability by making it easier for others to see what you’re engaging with on Twitter. This can enhance trust and authenticity in online interactions.

Considerations for Public Likes

Before making your likes public, consider the following factors:

1. Privacy: Your likes will be visible to anyone who visits your profile. If you’re concerned about privacy, you may want to reconsider making your likes public.

2. Reputation: Your likes can reflect your interests and values. Consider how you want others to perceive you based on the tweets you like.

3. Harassment: Making your likes public can make you more susceptible to online harassment. Be aware of this potential risk before proceeding.

4. Algorithms: Twitter’s algorithm may use your likes to tailor your timeline and recommend content. This can lead to a more personalized experience, but it can also limit your exposure to diverse viewpoints.

5. Social Connections: Making your likes public can be a way to connect with others who share similar interests. However, it can also create social pressure to conform to certain viewpoints.

6. Professionalism: If you use Twitter for professional networking, consider how making your likes public might impact your reputation. Some employers may view it as unprofessional.

7. Personal Growth: Sharing your likes publicly can make you more accountable for your opinions. It can also encourage you to explore different perspectives and challenge your own biases.

8. Moderation: Be mindful of the tweets you like. Avoid liking tweets that are offensive, misleading, or contain personal attacks.

9. Accessibility: Making your likes public can make it easier for people with disabilities to discover content that interests them. Screen readers can read out the text of your likes, making them accessible to users with visual impairments.

Benefit Drawback
Increased social connections Potential for harassment
Improved content recommendations Limited exposure to diverse viewpoints
Personal accountability Privacy concerns
Enhanced accessibility Potential for reputational damage

How To Make Your Likes Public On Twitter

If you want to make your likes public and allow everyone see what you like on Twitter, you can follow these simple steps:

  1. Log in to your Twitter account and click on the “Profile” icon on the left side of the screen.
  2. Click on the “Settings and privacy” tab in the left-hand menu.
  3. Scroll down to the “Privacy and safety” section and click on the “Edit your profile” button.
  4. Under the “Profile privacy” section, check the box next to “Make my likes public.”
  5. Click on the “Save changes” button at the bottom of the page.

Once you have completed these steps, your likes will be public and anyone will be able to see what you like on Twitter.

People Also Ask

Can I make some of my likes private and some public?

No, Twitter does not allow you to choose which likes to make public and which to keep private. All of your likes will be either public or private.

What happens if I make my likes public?

When you make your likes public, anyone will be able to see what you like on Twitter. This includes your followers, people you don’t follow, and even people who are not logged in to Twitter.

5 Best Weapons in Fallout Shelter

5 Ways To Get Rare Candy In Pokemon Go

In the aftermath of a nuclear apocalypse, when the world has been reduced to a barren wasteland, the only hope for survival may lie in the depths of a fallout shelter. But even in the most well-stocked shelter, resources are scarce, and every decision must be carefully considered. One of the most important choices you will face is which weapon to choose to protect yourself and your loved ones. The M1 Garand is the perfect choice for a fallout shelter, as it is a reliable, powerful, and versatile weapon that can be used in a variety of situations.

The M1 Garand is a semi-automatic rifle that was first developed in the 1930s. It was the standard infantry rifle for the United States military during World War II, and it saw extensive use in the Korean War and the Vietnam War. The M1 Garand is a gas-operated rifle that uses an eight-round en bloc clip. It has a range of up to 800 yards, and it can fire up to 30 rounds per minute. The M1 Garand is a powerful and accurate weapon, and it is well-suited for self-defense in a fallout shelter.

In addition to its reliability, power, and versatility, the M1 Garand is also relatively easy to maintain. It can be disassembled and cleaned in the field, and it does not require any special tools or equipment. The M1 Garand is also relatively inexpensive, making it a good value for the money. If you are looking for the best weapon for your fallout shelter, the M1 Garand is a great choice.

M1 Garand

The Broadsider: Unleashing Naval Firepower in the Depths of the Shelter

In the post-apocalyptic wasteland of Fallout, the Broadsider stands as a testament to the ingenuity and firepower that can be concealed beneath the surface. Originally designed as a naval cannon for use on Liberty Prime, this formidable weapon has found a new home within the confines of Vaults and secret bunkers.

The Broadsider’s immense size and weight make it an immovable fortress within the shelter. Its triple gun barrels protrude from the wall, ready to unleash a barrage of bombardment and pepper the denizens of the wasteland with a relentless storm of high-explosive weaponry.

10. Variability in Ammunition Types: A Versatile Arsenal

One of the Broadsider’s greatest strengths lies in its versatility. It can accommodate a wide range of ammunition types, each tailored to specific targets and tactical situations:

Ammunition Type Description
Nuclear Warhead Devastating against large groups of enemies, obliterating them in a nuclear blast
Cannonball Heavy and impactful, delivering a direct hit with precision accuracy
Proximity Mine Explodes upon detecting nearby enemies, creating a deadly surprise trap
Trident Missile Launches a nuclear missile, capable of causing widespread destruction

Fallout Shelter: The Best Weapon

When it comes to choosing the best weapon for your Fallout Shelter, there are a few things you need to keep in mind. First, what is your playstyle? Do you prefer to go for stealth, power, or a mix of both? Second, what is your budget? Some weapons are more expensive than others, so it’s important to factor that in.

Finally, what are your goals? Are you looking to take down raiders, or just to defend your shelter from attack? Once you’ve considered all of these factors, you can start to narrow down your options.

If you’re looking for a powerful weapon that can take down raiders quickly and effectively, then the Fat Man is a good choice. This weapon fires mini-nukes, which can do devastating damage to both enemies and structures. However, the Fat Man is also very expensive and heavy, so it’s not the best choice for stealth missions.

If you’re looking for a more versatile weapon that can be used for both stealth and power, then the Assault Rifle is a good option. This weapon is accurate and powerful, and it can be fitted with a suppressor to make it even more stealthy. However, the Assault Rifle is not as powerful as the Fat Man, and it can be expensive to upgrade.

If you’re on a budget, then the 10mm Pistol is a good choice. This weapon is cheap and easy to find, and it can be effective in both stealth and power situations. However, the 10mm Pistol is not as powerful as the Fat Man or the Assault Rifle, and it can be difficult to find ammo for it.

People Also Ask

What is the best weapon for a beginner?

The 10mm Pistol is a good choice for beginners because it is cheap, easy to find, and can be effective in both stealth and power situations.

What is the most powerful weapon in Fallout Shelter?

The Fat Man is the most powerful weapon in Fallout Shelter. It fires mini-nukes, which can do devastating damage to both enemies and structures.

What is the best weapon for stealth missions?

The Assault Rifle is a good choice for stealth missions because it can be fitted with a suppressor to make it even more stealthy.

10 Surefire Signs Your Crush Has a Thing for You

5 Ways To Get Rare Candy In Pokemon Go

Conversation Starters

Engaging in conversations is a crucial aspect of gauging someone’s interest in you. If your crush seems genuinely intrigued and eager to engage in discussions with you, it’s a positive sign. Pay attention to how they respond to your attempts at initiating conversations and maintain eye contact during your exchanges.

8. Are They Curious About Your Life?

If your crush actively asks about your life, hobbies, interests, and day-to-day experiences, it suggests that they’re interested in getting to know you better. Genuine curiosity about your well-being and the details of your life can be a strong indication of their affection.

Signs They’re Curious Signs They’re Not Curious
Asks questions about your hobbies, passions, and experiences Avoids asking questions or keeps them superficial
Listens attentively to your responses Doesn’t seem engaged or tunes out during conversations
Initiates conversations frequently Requires you to carry the majority of the conversation

Interest in Your Life

Your crush will want to know more about you, so they may ask questions about your interests, hobbies, and goals. They may also share some of their own interests with you.

They ask about your family and friends

If your crush is interested in you, they will want to know more about your life. This may include asking about your family and friends.

They remember things you tell them

If your crush remembers things you tell them, it’s a sign that they are paying attention to you and interested in what you have to say.

They try to make plans with you

If your crush is interested in you, they will try to make plans with you. This could be anything from going for a walk to seeing a movie.

They make time for you even when they are busy

If your crush is willing to make time for you even when they are busy, it’s a sign that they value your time.

They go out of their way to do things for you

If your crush goes out of their way to do things for you, it’s a sign that they care about you.

They listen to you when you talk

If your crush listens to you when you talk, it’s a sign that they are interested in what you have to say.

They give you their full attention when you are together

If your crush gives you their full attention when you are together, it’s a sign that they are interested in spending time with you.

They are always there for you

If your crush is always there for you, it’s a sign that they care about you.

5 Ways to Know If Your Phone Is Being Tracked

5 Ways To Get Rare Candy In Pokemon Go
Does Your Phone Know Your Every Move? Find Out Now

In the digital age, our smartphones have become an integral part of our lives. We use them to stay connected with friends and family, manage our finances, and access information. However, with great convenience comes great responsibility. It is important to be aware of the potential risks associated with using a smartphone, including the risk of being tracked. There are a number of ways that your phone can be tracked, and it is important to know how to identify these methods so that you can take steps to protect your privacy.

One of the most common ways that your phone can be tracked is through the use of GPS (Global Positioning System). GPS is a satellite-based system that can be used to determine the location of a device within a few meters. This technology is used in a variety of applications, including navigation, mapping, and tracking. If you have enabled location services on your phone, then your phone is constantly transmitting its location to the GPS satellites. This information can be accessed by anyone who has the proper equipment and knowledge.

Another way that your phone can be tracked is through the use of cell tower triangulation. Cell tower triangulation is a method of determining the location of a device by measuring the signal strength of the device from multiple cell towers. This method is less accurate than GPS, but it can still be used to track a device within a few hundred meters. Cell tower triangulation is often used by law enforcement to track suspects and by businesses to track employees who are using company phones.

Signs of GPS Tracking

1. Unusually High Battery Drain: GPS tracking consumes significant power, especially when running continuously. If your phone’s battery is draining faster than usual, especially when you’re not actively using it, it could be an indication of unauthorized GPS tracking.

– Sudden decrease in battery life
– Rapid battery drain even when the phone is idle
– Battery saver mode not effective in conserving battery
– Battery temperature unusually high
– Phone feels warm or hot to the touch, even when not in use

2. Background App Activity

Monitor your phone’s app activity to identify any suspicious behavior. If an app is running background services even when you’re not actively using it, it could be collecting your location data.

3. Unfamiliar or Hidden Apps

Examine your phone’s installed apps for any unfamiliar or unknown ones. Some tracking software may disguise itself as legitimate apps or hide itself in your app list.

4. Suspicious Location Prompts

When your phone’s GPS is being accessed, you may notice frequent location prompts or notifications from unfamiliar apps. These prompts often ask for permission to access your location, which tracking apps require.

5. Unfamiliar Tracking Links

Beware of suspicious links in messages or emails that claim to provide location tracking services. Clicking on these links may install tracking software on your phone.

Unusual Battery Usage

A telltale sign of phone tracking is excessive battery consumption. Remember, background apps and processes constantly drain your battery, but they should not lead to rapid depletion.

Interpreting Battery Usage Data

To assess your battery usage, navigate to your phone’s “Settings” menu, then “Battery.” You’ll see a list of apps and their corresponding battery consumption percentage. Here’s how to interpret the data:

High Consumption (10% or More) Moderate Consumption (5-10%) Low Consumption (Less than 5%)
Apps that are actively used or constantly running (e.g., GPS, social media, streaming) Apps that are occasionally used, such as messaging or music players Apps that are rarely used or have been closed

If you notice a sudden spike in battery consumption by an unfamiliar app or even a legitimate app that is not known for high usage, it could indicate tracking.

Unexplained File Changes

Modified Files Without Your Knowledge

A clear sign that your phone may be tracked is unexpected modifications in your files or settings. This could include changes to apps, system settings, or even the creation of new files and folders you didn’t create.

Unrecognized File Extensions

If you notice unusual file extensions that you don’t recognize on your phone, it’s a good idea to investigate further. These files could be malicious software or tracking tools installed without your knowledge.

Unexpected File Size Changes

Another red flag to look out for is significant changes in file sizes. For example, an app’s size suddenly increasing or a system file becoming unexpectedly large could indicate that tracking software has been added.

File Expected Size Detected Size
com.unknown.app 10 MB 25 MB
system.db 100 MB 150 MB

Unexpected Data Usage

One of the most noticeable signs that your phone is being tracked is a sudden increase in data usage. This is because tracking software can use a significant amount of data to send your location and other information back to the tracker. If you notice that your data usage has spiked without any explanation, it may be a sign that your phone is being tracked.

How to Check for Unusual Data Usage

To check for unexpected data usage, you can go to your phone’s settings and look at your data usage history. You can compare your current data usage to your previous usage to see if there has been a significant increase. If you find that your data usage has increased without any explanation, it may be a sign that your phone is being tracked.

Typical Levels of Data Usage

Activity Data Usage
Web browsing 5-10 MB per hour
Social media 20-50 MB per hour
Video streaming 300-500 MB per hour

Unusual Phone Behavior

1. Rapid Battery Drain

If your phone’s battery drains unusually quickly without any apparent reason, it could be a sign of tracking software running in the background. Tracking apps consume significant power to keep up with the phone’s location and activity.

2. Sudden Heat

Overheating of your phone, even when it’s not in use, can indicate tracking software activity. These apps often run intensive processes that generate heat, especially if they’re running continuously in the background.

3. Unexplained Data Usage

Tracking apps can send location and activity data to remote servers. If you notice a sudden increase in your data usage, particularly when your phone is idle, it could be a sign of tracking software.

4. Unusual App Behavior

Certain apps may exhibit strange behavior if your phone is being tracked. For example, apps may start crashing or responding slowly, or they may request excessive permissions that are not necessary for their intended function.

5. Unfamiliar Processes in Task Manager

Open the task manager on your phone and check for unfamiliar or suspicious processes running. Tracking apps may try to disguise themselves by using generic or cryptic names.

6. Malicious Websites and Apps

Installing malicious apps or visiting compromised websites can grant attackers access to your phone’s location and other data. Be cautious of unsolicited messages or emails that ask you to download or open links.

Malicious Websites and Apps Indicators
Suspicious Pop-ups Insistent pop-ups or warnings that seem out of place or unrelated to your current activity
Redirects to Unknown Sites Unexpectedly being redirected to unfamiliar or potentially dangerous websites
Unusual Permissions Requests Apps that request access to sensitive information or permissions that are not necessary for their function
Rapid App Crashes Frequent app crashes or instances of apps becoming unresponsive

Hidden Apps or Software

If you suspect your phone is being tracked, one of the first things you should do is check for hidden apps or software. These apps can be installed without your knowledge or consent, and they can be used to track your location, monitor your activity, and even access your personal data.

To check for hidden apps, go to your phone’s settings and look for a list of installed apps. If you see any apps that you don’t recognize, or that you don’t remember installing, they may be hidden apps.

Tracking Apps with Various Purposes

There are many different types of tracking apps, each with its tracking purpose. Some of the most common types of tracking apps include:

Type of Tracking App Purpose
Location tracking apps Track your location using GPS
Activity monitoring apps Track your activity, such as steps taken, calories burned, and sleep patterns
Data collection apps Collect your personal data, such as your name, email address, and phone number
Remote control apps Allow someone else to remotely control your phone
Spyware apps Secretly track your activity without your knowledge or consent
Keylogger apps Record everything you type on your phone

Background Noise or Echoes

One potential sign that your phone is being tracked is the presence of unexplained background noise or echoes during calls. This can occur if the tracking software utilizes the phone’s microphone to capture ambient sounds, potentially revealing your location or activities. However, it’s important to note that background noise can also be caused by poor network connectivity or faulty hardware, so further investigation is necessary to determine if it’s a legitimate indication of tracking.

Here are some additional details to consider:

  • Constant noise: If you consistently experience background noise or echoes during calls, regardless of the network or location, it could be a sign of tracking software.
  • Unfamiliar noises: Pay attention to any unfamiliar or unusual sounds during calls, such as clicking, buzzing, or static. These may indicate the presence of tracking software.
  • Echoes in isolated areas: If you notice echoes while making calls in areas where you would normally expect clear reception, it could suggest that your phone is being monitored remotely.
  • Noise reduction features: Some tracking software may attempt to minimize background noise to avoid detection. If your phone typically employs noise reduction features but you suddenly notice a lack of such functionality, it could be a red flag.
Symptom Potential Cause
Background noise or echoes Tracking software capturing audio
Constant noise Tracking software continuously monitoring
Unfamiliar noises Tracking software generating sounds
Echoes in isolated areas Remote monitoring or signal interference
Loss of noise reduction Tracking software suppressing noise

Sudden Temperature Changes

If your phone is being used to track your location, it will require additional power to run the tracking software and transmit your location data. This increased activity can cause the phone’s temperature to rise. If you notice your phone is suddenly running hotter than usual, it could be a sign that it’s being tracked.

Here are some things to look for:

  • The phone feels warm to the touch, even when it’s not being used.
  • The phone’s battery drains more quickly than usual.
  • The phone’s performance slows down, or apps crash more frequently.

If you’re concerned that your phone may be being tracked, you can try the following:

  • Restart your phone. This will stop any tracking software that may be running and give you a chance to check for any suspicious apps.
  • Check your phone’s app permissions. Make sure that no apps have access to your location data without your permission.
  • Disable location services. This will prevent any apps from tracking your location, even if they have permission to do so.

Privacy Policy Breaches

Companies that track your phone must have a privacy policy in place that explains how they collect, use, and share your data. If you suspect your phone is being tracked, here’s how to check the privacy policy of the suspected tracking company:

  1. Identify the potential tracking company. This could be a social media app, a fitness tracker, or a mobile game.
  2. Visit the company’s website. Look for a link to the Privacy Policy in the footer of the website.
  3. Review the Privacy Policy. Pay attention to the following sections:
    • Data Collection: This section should describe what data the company collects from your phone, such as your location, contacts, and browsing history.
    • Data Use: This section should explain how the company uses your data, such as to personalize your experience or target you with ads.
    • Data Sharing: This section should disclose if the company shares your data with third parties, and if so, under what circumstances.
    • Look for suspicious clauses. Be wary of any clauses that grant the company broad rights to collect, use, or share your data.
    • Contact the company. If you have any questions or concerns about the company’s privacy policy, you can contact the company directly.
    • Here is a table summarizing the key things to look for in a privacy policy:

      Section What to Look For
      Data Collection What data is collected from your phone?
      Data Use How is your data used?
      Data Sharing Is your data shared with third parties?

      How To Know If Phone Is Being Tracked

      There are a few ways to tell if your phone is being tracked. One way is to check your phone’s battery life. If your battery is draining more quickly than usual, it could be a sign that your phone is being tracked. Another way to tell if your phone is being tracked is to check your phone’s data usage. If your data usage is higher than usual, it could be a sign that your phone is sending data to a tracking device. Finally, you can also check your phone’s location settings. If your phone’s location is turned on without your knowledge, it could be a sign that your phone is being tracked.

      People also ask

      How can I stop my phone from being tracked?

      There are a few ways to stop your phone from being tracked. One way is to turn off your phone’s location services. Another way is to disable the apps that have access to your location. You can also use a privacy app to block tracking.

      How can I tell if my phone is being tracked by my partner?

      There are a few ways to tell if your phone is being tracked by your partner. One way is to check your phone’s battery life. If your battery is draining more quickly than usual, it could be a sign that your phone is being tracked. Another way to tell if your phone is being tracked is to check your phone’s data usage. If your data usage is higher than usual, it could be a sign that your phone is sending data to a tracking device. Finally, you can also check your phone’s location settings. If your phone’s location is turned on without your knowledge, it could be a sign that your phone is being tracked.

5 Steps to Effortlessly Start Your Frigidaire Dishwasher

5 Ways To Get Rare Candy In Pokemon Go

Featured Image
$title$

Experience the convenience of sparkling clean dishes with your Frigidaire dishwasher. Whether you’re tackling a pile of after-dinner plates or preparing for a special occasion, getting your dishwasher up and running is a crucial first step. In this comprehensive guide, we’ll delve into the effortless process of starting your Frigidaire dishwasher, empowering you to enjoy pristine cutlery and tableware with minimal effort.

Before initiating the wash cycle, it’s essential to ensure your dishwasher is properly loaded. Arrange dishes securely, avoiding overcrowding and allowing water to reach all surfaces. Once the dishwasher is filled, add the recommended amount of detergent to the dispenser and close the lid. For optimal results, use a specifically formulated dishwasher detergent to prevent residue buildup and ensure sparkling dishes every time.

With the dishwasher loaded and detergent added, you’re ready to initiate the wash cycle. Locate the power button on the exterior panel and press it to activate the machine. Next, select the desired wash cycle based on the level of cleaning required. Frigidaire dishwashers offer a range of options, including Normal, Heavy, Delicate, and Rinse Only. Once the cycle is selected, press the “Start” button to commence the washing process. Sit back and relax as your Frigidaire dishwasher takes care of the dirty work, leaving you with impeccably clean dishes and the satisfaction of a well-accomplished task.

Preparing the Dishwasher

Before you can start using your Frigidaire dishwasher, you need to prepare it by following these steps:

  1. Loading the Dishwasher:
    • Make sure all dishes are free of food residue and debris.
    • Load dishes into the appropriate racks:
      • Top rack: Plates, bowls, glasses, mugs
      • Bottom rack: Pots, pans, silverware, large utensils
    • Place dishes so that they do not block the water jets.
  2. Adding Detergent:
    • Measure out the correct amount of dishwasher detergent and pour it into the detergent dispenser.
    • Close the dispenser tightly.
  3. Rinse Aid:
    • If desired, add rinse aid to the dispenser to help with drying and prevent water spots.
  4. Check the Water Supply:
    • Ensure that the dishwasher is connected to a proper water supply.
    • Check that the water supply valve is turned on.
  5. Power:
    • Plug the dishwasher into an outlet.
    • Flip the circuit breaker or switch on the power supply.


Connecting the Water Supply

Before you can start using your Frigidaire dishwasher, you’ll need to connect it to the water supply. Here’s how to do it:

  1. Turn off the water supply to your sink.
  2. Disconnect the old water supply line from the sink faucet.
  3. Connect the new water supply line to the sink faucet.
  4. Turn on the water supply to your sink.
  5. Connect the other end of the water supply line to the water inlet valve on the back of the dishwasher.
  6. Tighten the connection using a wrench.


The table below provides some additional tips for connecting the water supply to your Frigidaire dishwasher:

Tip Description
Use a new water supply line. Old or damaged water supply lines can leak, which can damage your dishwasher.
Make sure the water supply line is long enough. The water supply line should be long enough to reach from the sink faucet to the water inlet valve on the back of the dishwasher.
Tighten the connections securely. Loose connections can leak, which can damage your dishwasher.

Hooking Up the Drain

Connecting the drain hose to the sink drain is a crucial step in installing your Frigidaire dishwasher. Follow these instructions to ensure a proper and leak-free connection:

1. Locate the Drain Hose

The drain hose typically extends from the back or bottom of the dishwasher. It is usually made of flexible plastic and has a diameter of about 1-1/4 inches.

2. Position the Drain Hose

Run the drain hose to the sink drain and position it securely. Avoid creating kinks or sharp bends that could restrict water flow.

3. Connect the Drain Hose to the Sink Drain

There are two common methods for connecting the drain hose to the sink drain:

Connection Method Steps
Direct Connection
  • Remove the knockout plug from the side of the dishwasher’s drain port.
  • Insert the drain hose into the port and secure it with a hose clamp or threaded fitting.
  • Air Gap Connection
  • Install an air gap device on the countertop or sink rim.
  • Connect the drain hose to the inlet of the air gap.
  • Connect the outlet of the air gap to the sink drain.
  • Note: Refer to your dishwasher’s installation instructions for specific connection requirements.

    Leveling the Dishwasher

    Once you’ve placed your dishwasher in its desired location, it’s important to level it properly. This will ensure that the dishwasher operates smoothly and doesn’t cause any damage to your home.

    To level your dishwasher, follow these steps:

    1. Check the front and back of the dishwasher. The front should be slightly higher than the back. This will allow water to drain properly.
    2. Adjust the leveling legs. There are typically two or four leveling legs on the dishwasher. Use a wrench or pliers to adjust them until the dishwasher is level.
    3. Check the dishwasher again. Once you’ve adjusted the leveling legs, check the dishwasher again to make sure it’s level. If it’s not, continue to adjust the legs until it is.
    4. Secure the leveling legs. Once the dishwasher is level, tighten the nuts on the leveling legs to secure them in place.

    Additional Tips for Leveling Your Dishwasher

    • If you have a built-in dishwasher, you may need to remove the toe kick to access the leveling legs.
    • Use a level to ensure that the dishwasher is level front to back and side to side.
    • If you’re having trouble leveling the dishwasher, you can call a professional appliance repair technician for assistance.

    Securing the Dishwasher

    Ensuring the dishwasher is securely in place is crucial for its efficient operation and to prevent accidents.

    1. Decide on the Location

      Choose a suitable location for the dishwasher, ensuring it is level and has adequate space for opening the door and connecting water and power utilities.

    2. Connect the Water Supply

      Connect the water supply line to the designated water valve on the dishwasher. Use a compatible hose and secure the connection with a hose clamp or adapter.

    3. Drain Hose Installation

      Attach the drain hose to the dishwasher’s drain outlet and connect it to the kitchen sink’s drainpipe. Ensure the hose is free of kinks or bends.

    4. Power Connection

      Plug the dishwasher’s power cord into a dedicated electrical outlet that meets the required voltage and amperage specifications.

    5. Leveling the Dishwasher

      Using a level, adjust the dishwasher’s adjustable legs to ensure it is level both front-to-back and side-to-side. This proper leveling prevents water from pooling inside the dishwasher and ensures proper drainage.

      Adjusting the Dishwasher Legs
      – Rotate the legs clockwise to lower the dishwasher.
      – Rotate the legs counterclockwise to raise the dishwasher.
      – Use a wrench or adjustable pliers to tighten the legs once they are at the desired height.

    Installing the Control Panel and Door

    Preparing for Installation

    * Gather all necessary tools and materials.
    * Disconnect the dishwasher from power and water supply.
    * Clear a workspace around the dishwasher for easy access.

    Installing the Control Panel

    * Locate the control panel assembly.
    * Align the assembly with the mounting brackets on the dishwasher door.
    * Secure the assembly using screws or bolts.
    * Connect the wiring harness to the control board.

    Installing the Door

    * Remove the old door, if necessary.
    * Insert the new door into the opening.
    * Align the door hinges with the mounting points on the dishwasher frame.
    * Secure the door with screws or bolts.
    * Connect the door latch wiring harness.

    ⑥ Troubleshooting

    If the dishwasher does not start after installation, follow these troubleshooting steps:

    Table: Dishwasher Troubleshooting Guide

    Problem Solution
    Dishwasher does not power on Check power supply, fuses, and wiring
    Dishwasher does not fill with water Check water supply, inlet valve, and fill hose
    Dishwasher does not drain Check drain hose, drain pump, and disposal connection
    Dishwasher does not wash dishes Check spray arms, filter, and detergent dispenser
    Dishwasher is noisy Check for loose parts, improper water balance, or worn bearings

    Testing the Dishwasher

    Once you’ve finished setting up your dishwasher, it’s time to test it to ensure it’s working properly. Here’s how to do it:

    Prepare the Dishwasher

    Load the dishwasher with a few dirty dishes, making sure to distribute them evenly throughout the racks.

    Add Detergent

    Add the recommended amount of dishwasher detergent to the dispenser, typically found on the inside door of the dishwasher.

    Close the Door

    Close the dishwasher door firmly, ensuring it latches securely.

    Start the Dishwasher

    Locate the start button on the dishwasher’s control panel and press it to initiate the wash cycle.

    Monitor the Cycle

    Listen for the sound of water filling the dishwasher and the hum of the motor running. If you notice any unusual noises or leaks, stop the cycle and contact a qualified technician.

    Check the Dishes

    Once the wash cycle is complete, open the door and inspect the dishes. They should be clean and free of any food residue. If you notice any remaining food, repeat the wash cycle or adjust the detergent amount.

    Troubleshooting Common Dishwasher Issues

    If you encounter any problems with your dishwasher, here are some common issues and their potential solutions:

    Issue Solution
    Dirty dishes after washing Increase detergent amount, check filter, or run a hot water cycle to remove mineral buildup.
    Water leaking from the dishwasher Check door gasket for tears or damage, tighten hose connections, or call a technician.
    Dishwasher won’t start Check power supply, reset circuit breaker, or inspect start button for malfunctions.

    Operating the Dishwasher

    Once your Frigidaire dishwasher is installed and connected, you’re ready to start using it. Here’s a step-by-step guide:

    1. Load the Dishwasher

    Load dirty dishes into the dishwasher, ensuring they’re arranged properly to allow water and detergent to reach all surfaces. Avoid overloading the dishwasher, as this can affect cleaning efficiency.

    2. Add Detergent

    Pour the recommended amount of dishwasher detergent into the dispenser. Use only dishwasher-specific detergents, as regular dish soap can produce excessive suds.

    3. Close the Door

    Firmly close the dishwasher door to prevent leaks and ensure proper operation.

    4. Select a Cycle

    Choose a wash cycle that corresponds to the type and level of soil on your dishes. Common cycles include Normal, Rinse Only, and Heavy.

    5. Start the Cycle

    Press the “Start” or “Cycle Start” button to initiate the selected cycle.

    6. Check the Indicator Light

    Most Frigidaire dishwashers feature an indicator light that illuminates when the cycle is running or complete.

    7. Ongoing Operation

    The dishwasher will continue the wash cycle according to the selected settings. During the wash, you may hear water spraying, dishes moving, and the sound of the pump. Do not open the door while the dishwasher is in operation.

    8. Cycle Completion

    Once the cycle is complete, the dishwasher will typically beep or emit an audible signal. Open the door carefully to avoid steam, and unload your clean dishes.

    Cycle Description
    Normal For everyday cleaning of lightly soiled dishes.
    Rinse Only For rinsing dishes that will be washed later.
    Heavy For heavily soiled dishes or cookware.

    Starting Your Frigidaire Dishwasher

    To start your Frigidaire dishwasher, follow these simple steps:

    1. Load the dishwasher with dishes and detergent.
    2. Close the door firmly.
    3. Select the desired cycle and options.
    4. Press the “Start” button.

    Troubleshooting Common Issues

    The dishwasher does not start.

    If your dishwasher does not start, try the following:

    • Check if the dishwasher door is closed properly.
    • Make sure the power cord is plugged into a working outlet.
    • Check for a tripped circuit breaker or blown fuse.
    • Reset the dishwasher by unplugging it from the power supply for one minute and then plugging it back in.

    The dishwasher is not cleaning the dishes.

    If your dishwasher is not cleaning the dishes properly, try the following:

    • Check if the water pressure is strong enough. The minimum water pressure required is 20 psi.
    • Make sure the dishwasher filter is clean.
    • Try using a different detergent.
    • Run the dishwasher on a hotter cycle.
    • Clean the spray arms of the dishwasher.

    The dishwasher is making noise.

    If your dishwasher is making noise, try the following:

    • Check if there is something caught in the pump or drain hose.
    • Make sure the dishwasher is level.
    • Tighten any loose screws or bolts.
    • Run the dishwasher on a quieter cycle.

    The dishwasher is leaking.

    If your dishwasher is leaking, try the following:

    • Check if the door gasket is damaged.
    • Make sure the water supply hose is not leaking.
    • Tighten any loose fittings.
    • Replace the dishwasher drain hose if it is damaged or clogged.

    How to Start a Frigidaire Dishwasher

    Maintenance Tips

    Regularly maintaining your Frigidaire dishwasher is essential for ensuring its optimal performance and lifespan. Here are a few essential maintenance tips to consider:

    1. Clean the Filter

      The filter helps prevent food particles from entering the drain hose. Regularly clean the filter by removing it and rinsing it under running water.

    2. Check the Drain Hose

      Over time, food particles can accumulate in the drain hose and cause clogs. Inspect the drain hose regularly for any blockages and remove them if necessary.

    3. Clean the Spray Arms

      The spray arms distribute water evenly over the dishes. Clean the spray arms by removing them and soaking them in a solution of vinegar and water. Use a toothpick or brush to remove any clogs in the nozzles.

    4. Descale the Dishwasher

      Hard water can leave limescale deposits on the dishwasher’s components. Descale the dishwasher every few months by running a cycle with a commercial descaling solution.

    5. Check the Air Gap

      The air gap is a small device that prevents dirty water from backing up into the dishwasher. Ensure that the air gap is clear of any obstructions.

    6. Lubricate the Door Latch

      The door latch can become stiff over time. Lubricate the latch mechanism with a silicone-based lubricant to ensure smooth operation.

    7. Clean the Exterior

      Use a damp cloth with a mild detergent to wipe down the exterior of the dishwasher to prevent stains and streaks.

    8. Run a Maintenance Cycle

      Some Frigidaire dishwashers have a built-in maintenance cycle that cleans and disinfects the dishwasher’s interior. Run this cycle regularly as per the manufacturer’s instructions.

    9. Replace Worn Parts

      Over time, certain parts of the dishwasher may wear out and require replacement. Common parts that may need replacement include the door gasket, drain pump, and water inlet valve.

    10. Call for Professional Service

      If you encounter any major issues with your Frigidaire dishwasher, such as water leaks or electrical problems, it is recommended to call for professional service promptly.

    How to Start a Frigidaire Dishwasher

    Starting a Frigidaire dishwasher is a simple process that can be completed in just a few steps. Here’s how to do it:

    1. Load the dishwasher with dishes.
    2. Add detergent to the dispenser.
    3. Close the dishwasher door.
    4. Select the desired wash cycle.
    5. Press the start button.

    The dishwasher will start running and will automatically fill with water. The wash cycle will typically take about 2-3 hours to complete.

    People Also Ask About How to Start a Frigidaire Dishwasher


    What if the dishwasher doesn’t start?

    If the dishwasher doesn’t start, check the following:

    1. Make sure the dishwasher is plugged in.
    2. Make sure the dishwasher door is closed properly.
    3. Make sure the water supply is turned on.
    4. Check the circuit breaker or fuse to make sure the dishwasher is getting power.

    If you have checked all of these things and the dishwasher still doesn’t start, you may need to call a qualified appliance repair technician.


    How do I select the right wash cycle?

    The wash cycle you select will depend on the type of dishes you are washing.

    • For lightly soiled dishes, you can use the normal cycle.
    • For heavily soiled dishes, you can use the heavy cycle.
    • For delicate dishes, you can use the delicate cycle.

    You can also select additional options, such as the heated dry option or the extra rinse option.


    How do I clean the dishwasher?

    It is important to clean your dishwasher regularly to keep it running efficiently.

    1. Remove any food scraps or debris from the dishwasher.
    2. Run the dishwasher through a hot water cycle with a cup of white vinegar in the bottom of the dishwasher.
    3. Wipe down the interior of the dishwasher with a damp cloth.

    You can also clean the dishwasher filter by removing it and rinsing it under running water.

    5 Easy Steps to Open a BIN File

    5 Ways To Get Rare Candy In Pokemon Go

    Impact of Bin Openability on Workplace Efficiency

    The ease with which a bin can be opened has a significant impact on workplace efficiency. A poorly designed bin that is difficult to open can lead to lost time, frustration, and even injuries.

    1. Time Lost

    A bin that is difficult to open can waste valuable time. Employees may have to struggle with the bin, wasting time that could be better spent on productive tasks.

    2. Frustration

    A bin that is difficult to open can be frustrating for employees. This frustration can lead to decreased morale and productivity.

    3. Injuries

    A bin that is difficult to open can be dangerous. Employees may try to force the bin open, which could result in injuries.

    4. Increased Costs

    A bin that is difficult to open can lead to increased costs. Lost time, frustration, and injuries can all cost businesses money.

    How to Improve Bin Openability

    There are a number of things that can be done to improve bin openability.

    1. Use a well-designed bin

    A well-designed bin will be easy to open and close. Look for bins with lids that are easy to grip and mechanisms that are smooth and easy to operate.

    2. Place bins in an accessible location

    Bins should be placed in an accessible location so that employees can easily reach them. This will help to reduce lost time and frustration.

    3. Provide training on how to open bins

    Employees should be trained on how to properly open and close bins. This will help to prevent injuries and ensure that bins are opened and closed properly.

    Table: Impact of Bin Openability on Workplace Efficiency

    Factor Impact
    Time Lost Employees may have to struggle with the bin, wasting time that could be better spent on productive tasks.
    Frustration A bin that is difficult to open can be frustrating for employees. This frustration can lead to decreased morale and productivity.
    Injuries A bin that is difficult to open can be dangerous. Employees may try to force the bin open, which could result in injuries.
    Increased Costs Lost time, frustration, and injuries can all cost businesses money.

    How To Open Bin

    To open a bin, you will need to locate the release mechanism. This is usually a lever or button that is located on the front or side of the bin. Once you have located the release mechanism, you will need to press or pull it in order to open the bin. If the bin is locked, you will need to insert a key into the lock and turn it in order to unlock it.

    Once the bin is open, you can dispose of your trash or recycling. Be sure to close the bin lid securely after you have disposed of your trash or recycling. This will help to keep animals and pests out of the bin.

    People Also Ask

    How do I open a bin that is locked?

    If the bin is locked, you will need to insert a key into the lock and turn it in order to unlock it.

    How do I dispose of my trash or recycling?

    Once you have opened the bin, you can dispose of your trash or recycling. Be sure to close the bin lid securely after you have disposed of your trash or recycling.

    How do I keep animals and pests out of the bin?

    Be sure to close the bin lid securely after you have disposed of your trash or recycling. This will help to keep animals and pests out of the bin.